
A step by step smokey eye tutorial for creating fierce, smoldering eyes
Updated on June 6, 2018 Written by: 100% PURE®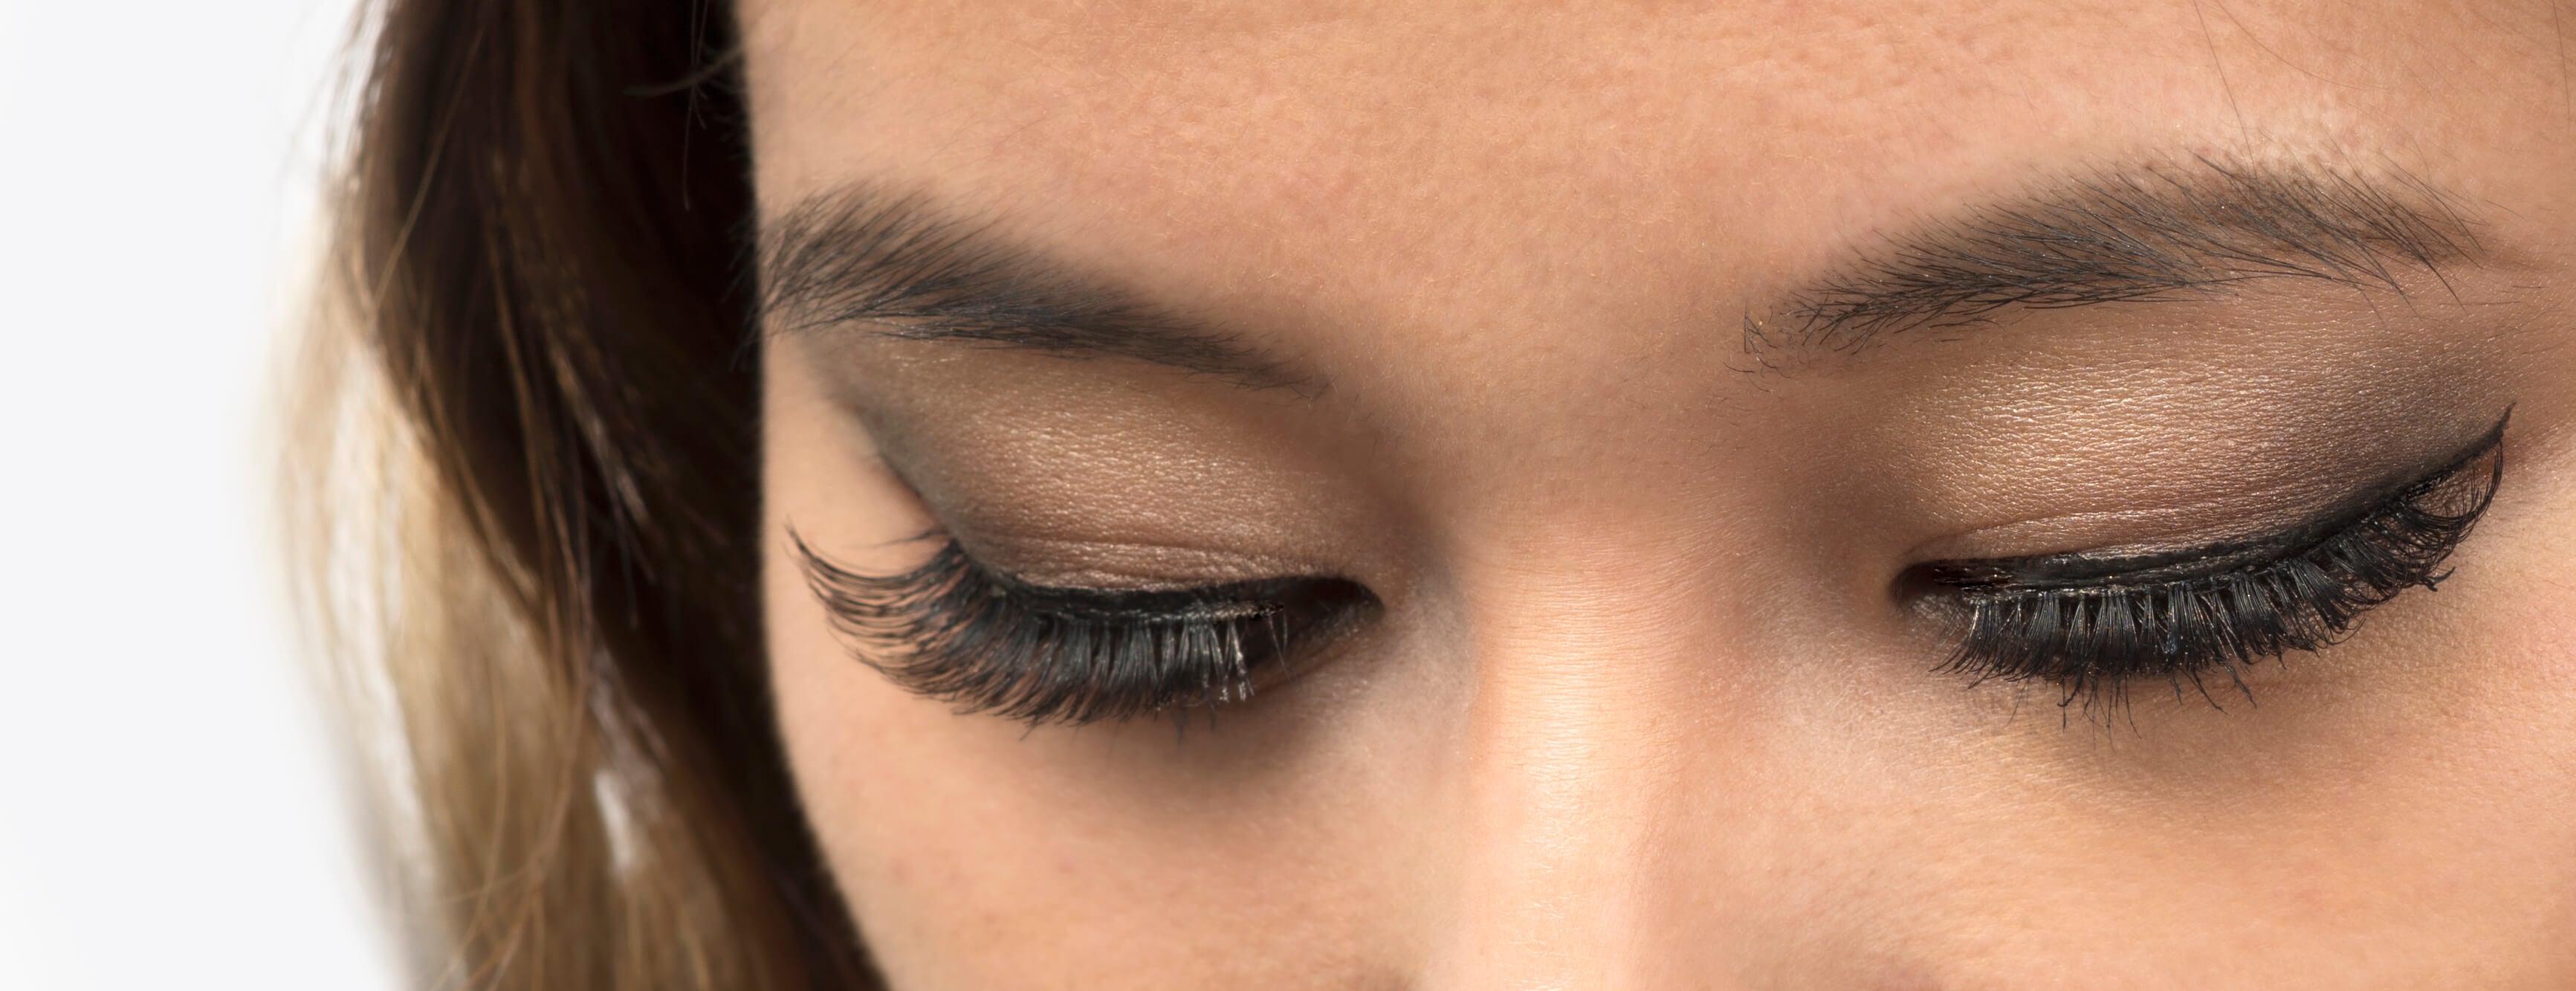
We brought you the winged eyeliner makeup tutorial, and today we’re back with another eye makeup tradition for you to master - smokey eyes. We’re all for that smoldering gaze that just exudes power. Or how about a playful smize that would make even Tyra Banks envious?
Getting the perfect smokey eyes, not raccoon eyes, can be tricky. A foolproof eye shadow layering technique is a must for flawless definition and the right level of drama. We’ve compiled a step by step smokey eye makeup tutorial, showing you how to achieve smokey eyes with fruit pigmented® makeup. Try it for your next night out, or whenever you’re in the mood to serve seductive Cleopatra vibes.
Smokey Eye Tutorial
Primer
Using a primer will go a long way in keeping your smokey eye makeup together. We’ve got a few primers that are all nourishing and promote flawless makeup application. Our guess is that you want a more mattified look with your smokey eyes, to create a silky smooth finish. We suggest you pick up our Mattifying Primer. Apply evenly over your cleansed skin and eye area, and let it set for a minute. Our primers are silicone free and do double duty - the seaweed collagen in our Mattifying Primer ensures smoother eye shadow application and also nourishes your skin. Now you’re ready to get started!
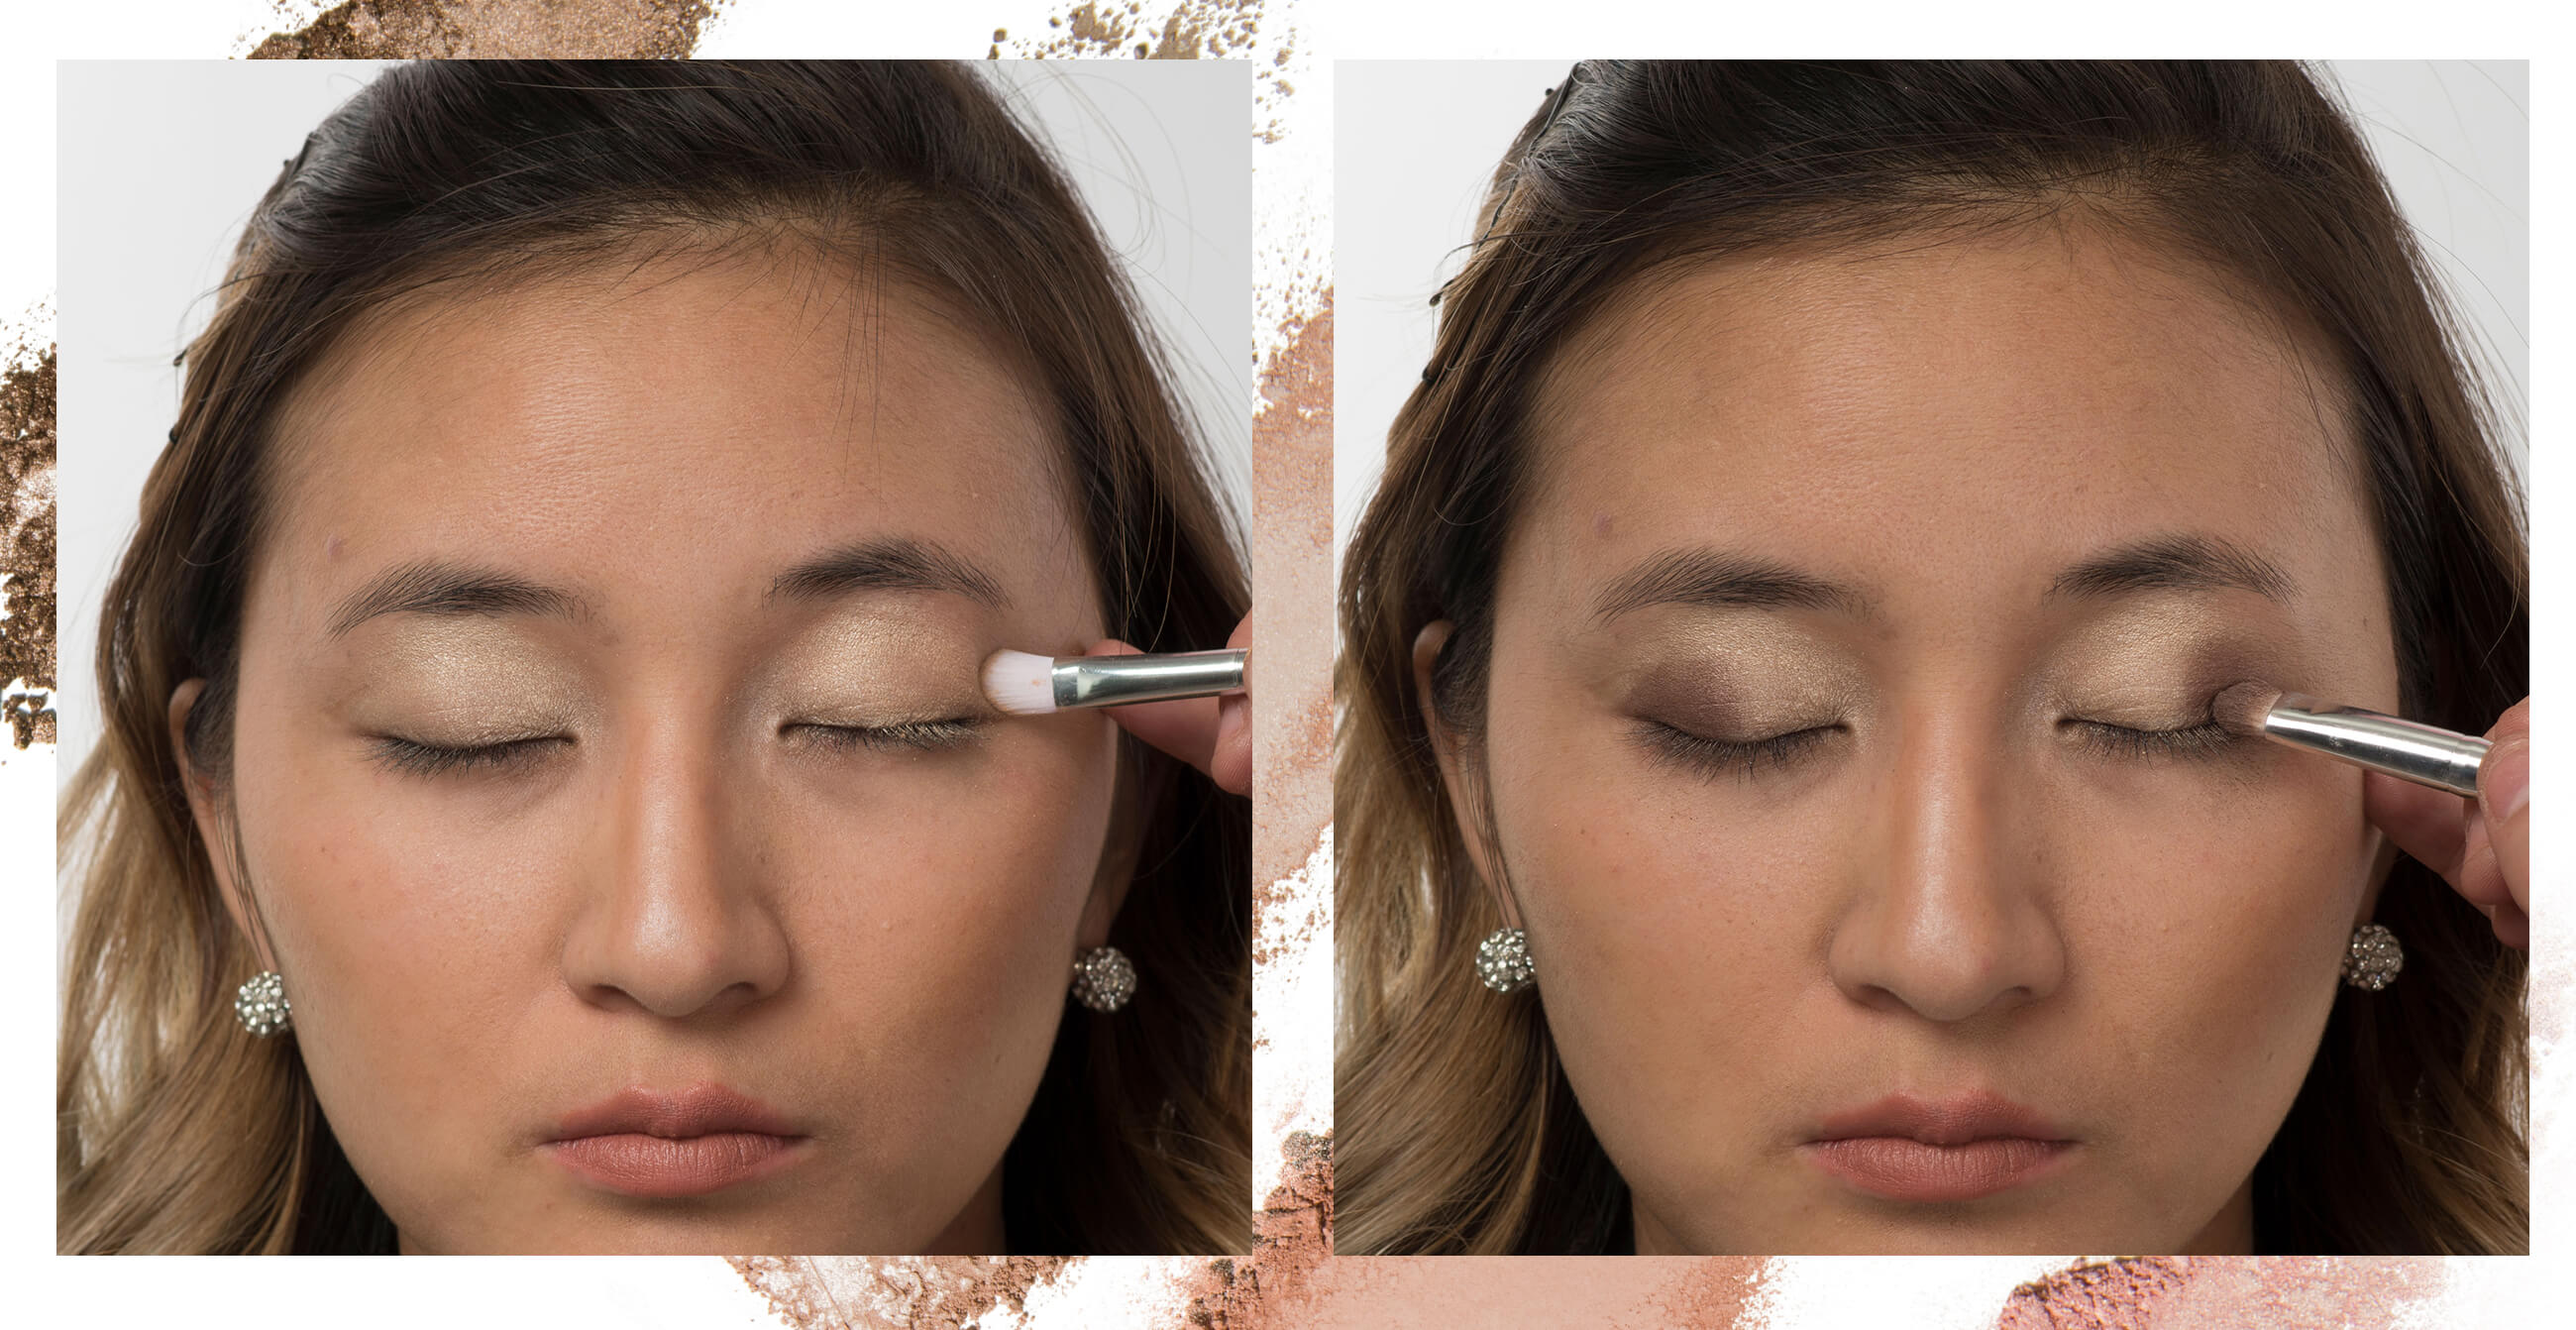
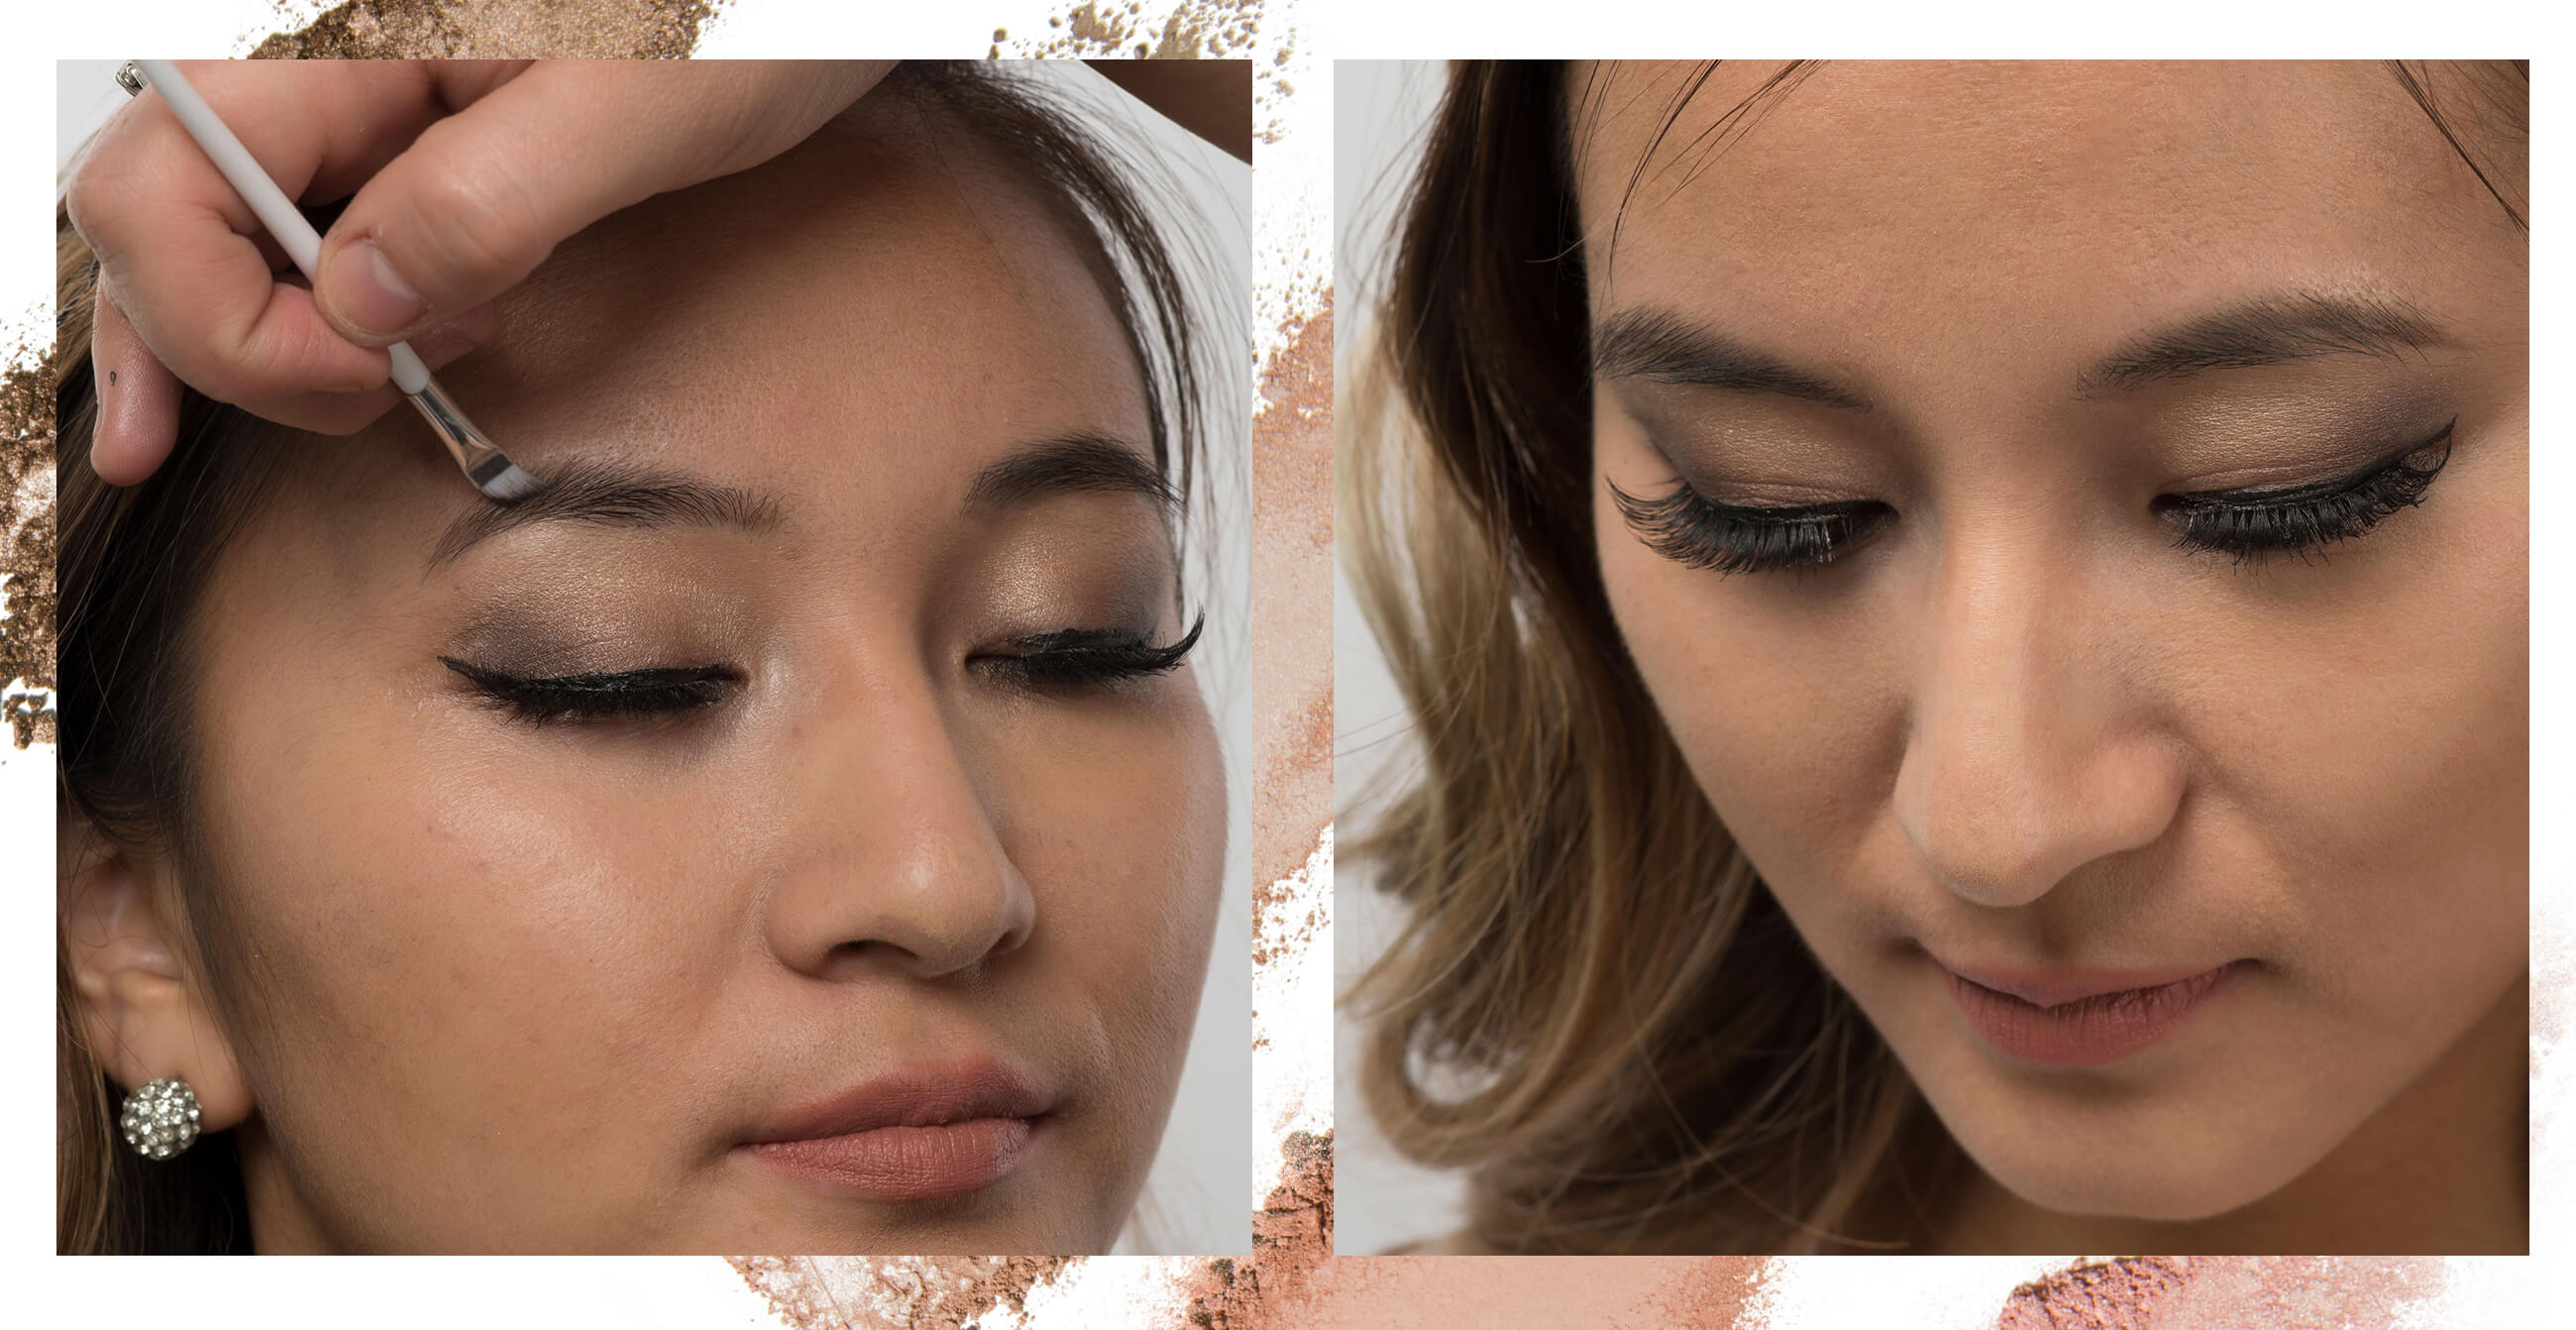
Step 1: Apply eye shadow base all over eyelids with Satin Eye Shadow: Halo and Cruelty Free Eye Shadow Brush.
To make sure your smokey eyes stay in place and prevent smudging, you’ll want to prep your canvas with an eye shadow base. We used Halo, a pearly white shimmer that’s the perfect base for a mysterious, gradient eye shadow look. Follow the natural curvature of your eyeball to create a rounded, almond shaped base. An eyeshadow base enhances color payoff, so feel free to cover your entire eyelid. Since our nourishing eyeshadows double as eye cream, there’s really no downside to how much you apply! Our satin eye shadows moisturize with avocado butter and rosehip oil for smooth, long lasting makeup application.
Step 2: Define eyes by layering Fruit Pigmented® Eye Shadow: Bronze Gold over eye shadow base.
Your next step in your smokey eyes prep is to get some metallic shimmer going. We chose Bronze Gold, a glamorous, cocktail-inspired eye shadow. Beginning from the middle of your eyelid, layer this eye shadow towards the outer corners of your eyelids. Follow the natural, rounded shape of your eye shadow base. Build color in short strokes to ensure the base color below isn’t peeping out. Remember to blend for a seamless transition between colors!
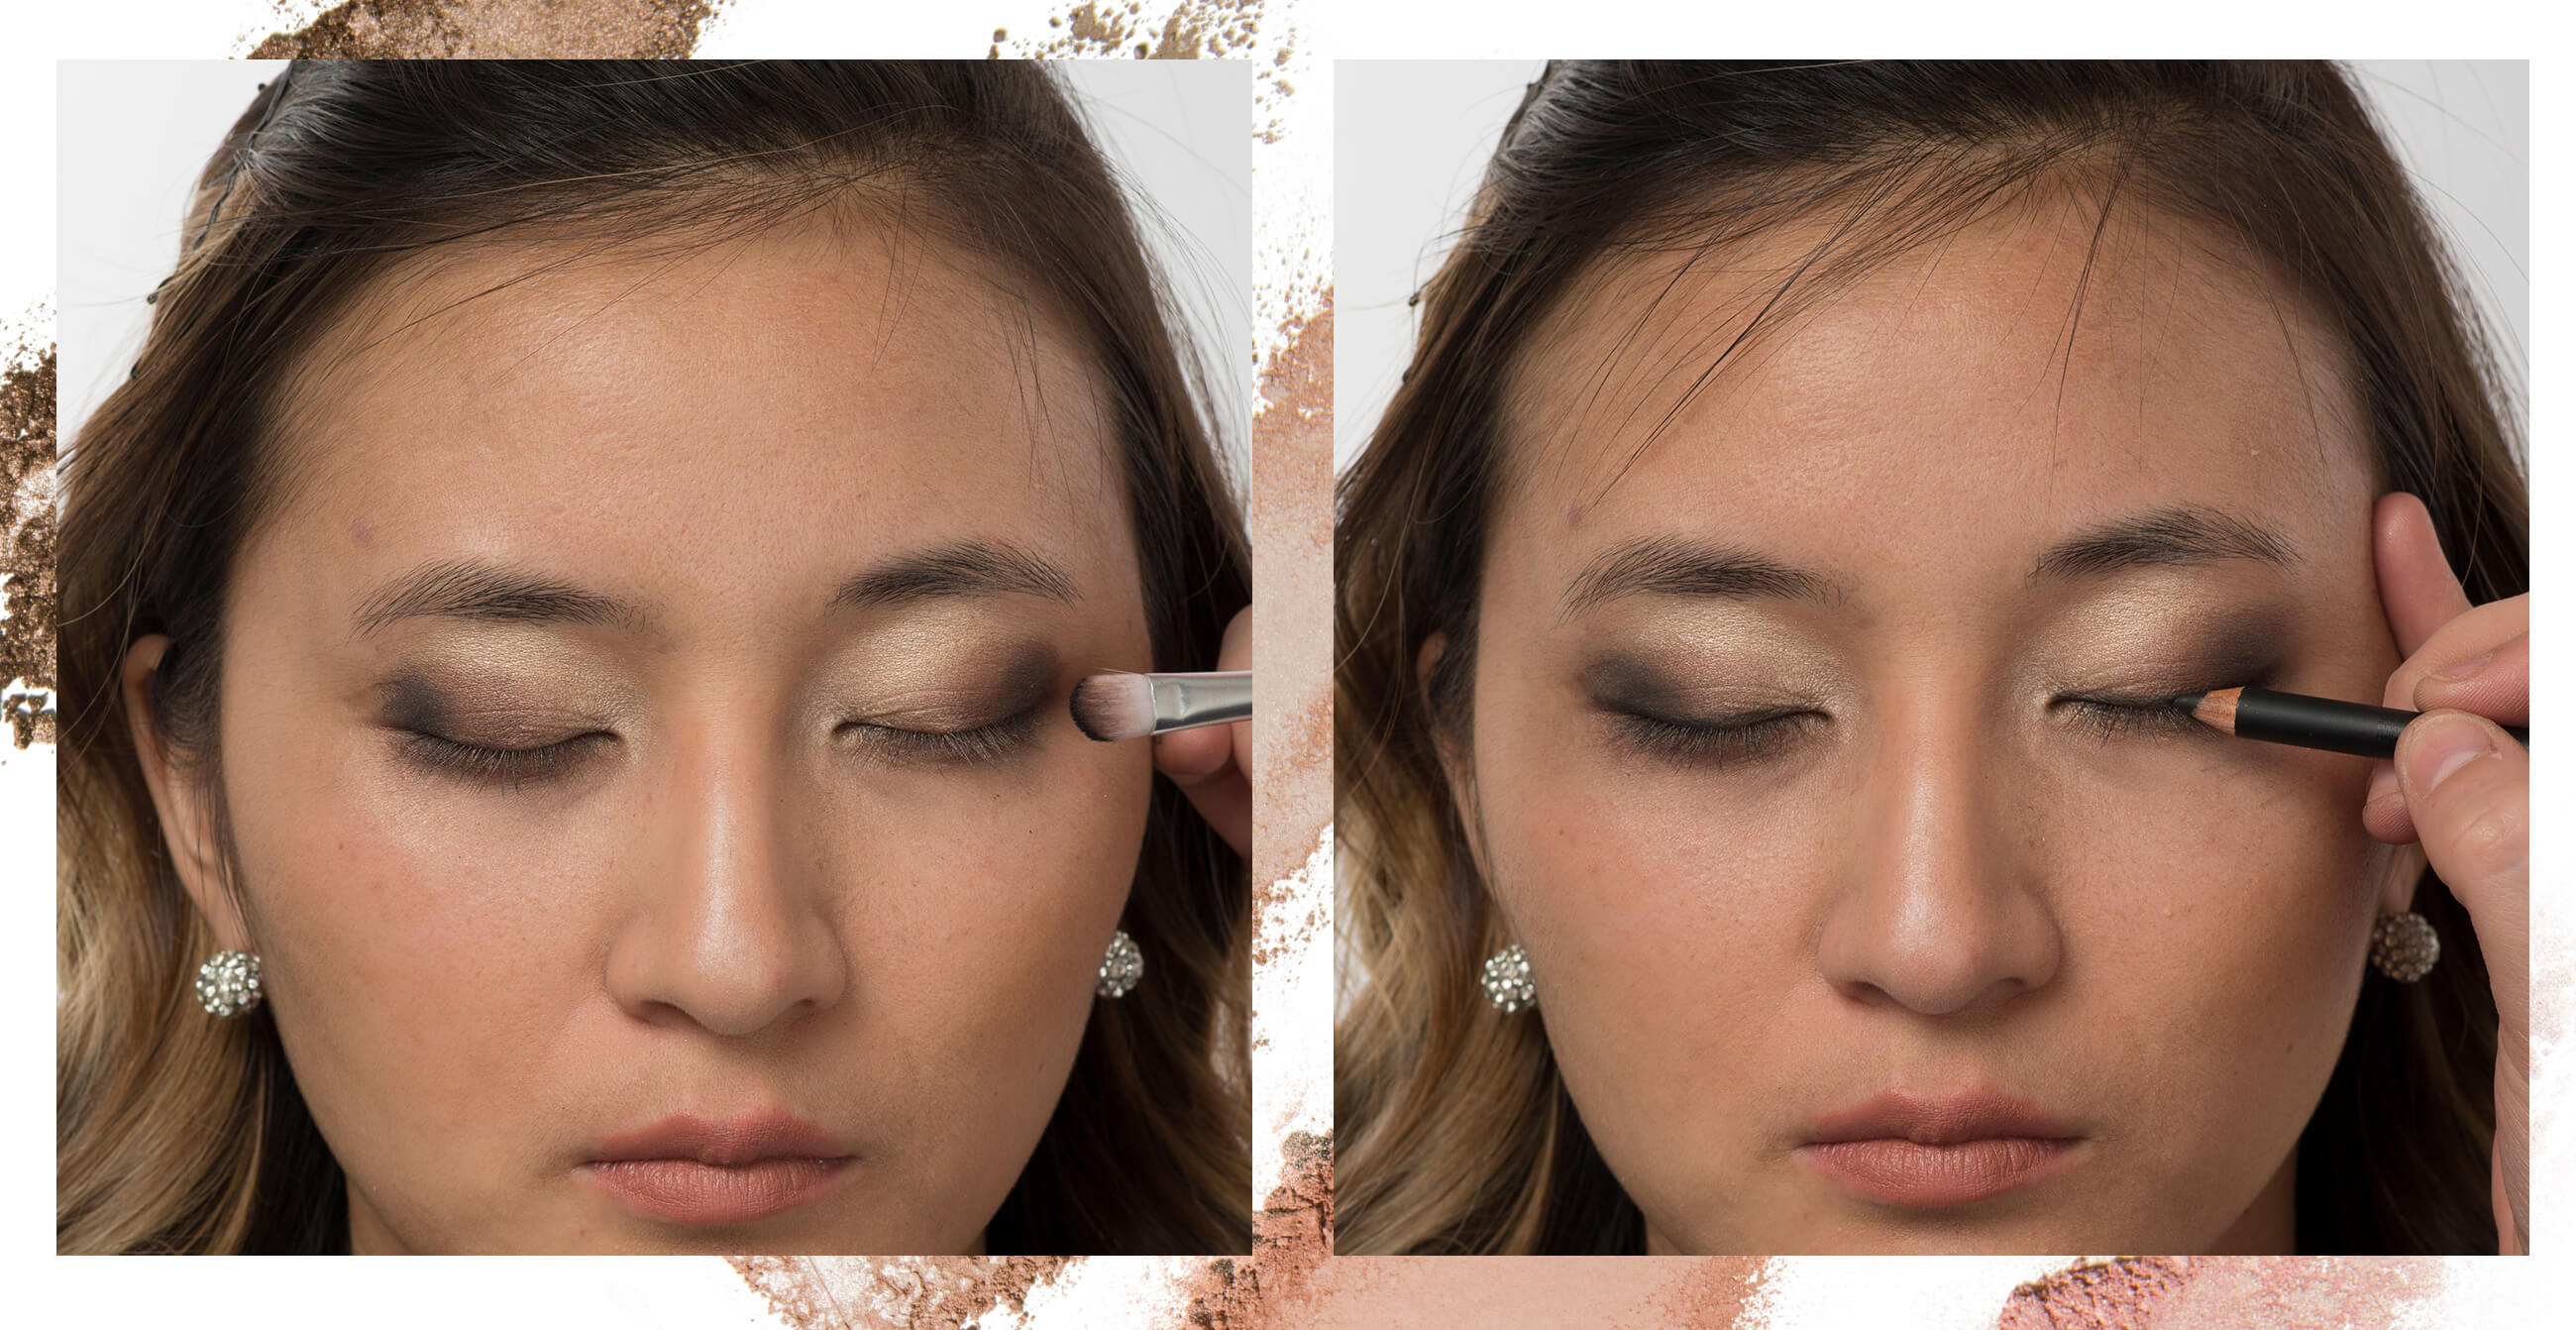
Step 3: Add intensity by building black eye shadow from Punk Princess Palette onto eyelid corners.
What would a classic smokey eye be without that fierce dark color? Beginning from the outer third of your eyelid, dab the black eye shadow “Unplugged” from Punk Princess Palette towards the outer corners of your eyelids. Use short strokes to guarantee precision. This pitch black eye shadow is pigmented with black tea and vitamin rich fruits and vegetables, rather than synthetic dyes that can irritate your precious eyes.
Step 4: Apply Creamy Long Last Liner: Blackest to upper lash line to enhance dark smokey color.
Stick to short strokes close to your upper lash line for more precise application. Adding this black eyeliner pencil will help bring out the stunning black pigments in your eye shadow. It will also help to add a bit of structure to your smokey eyes.
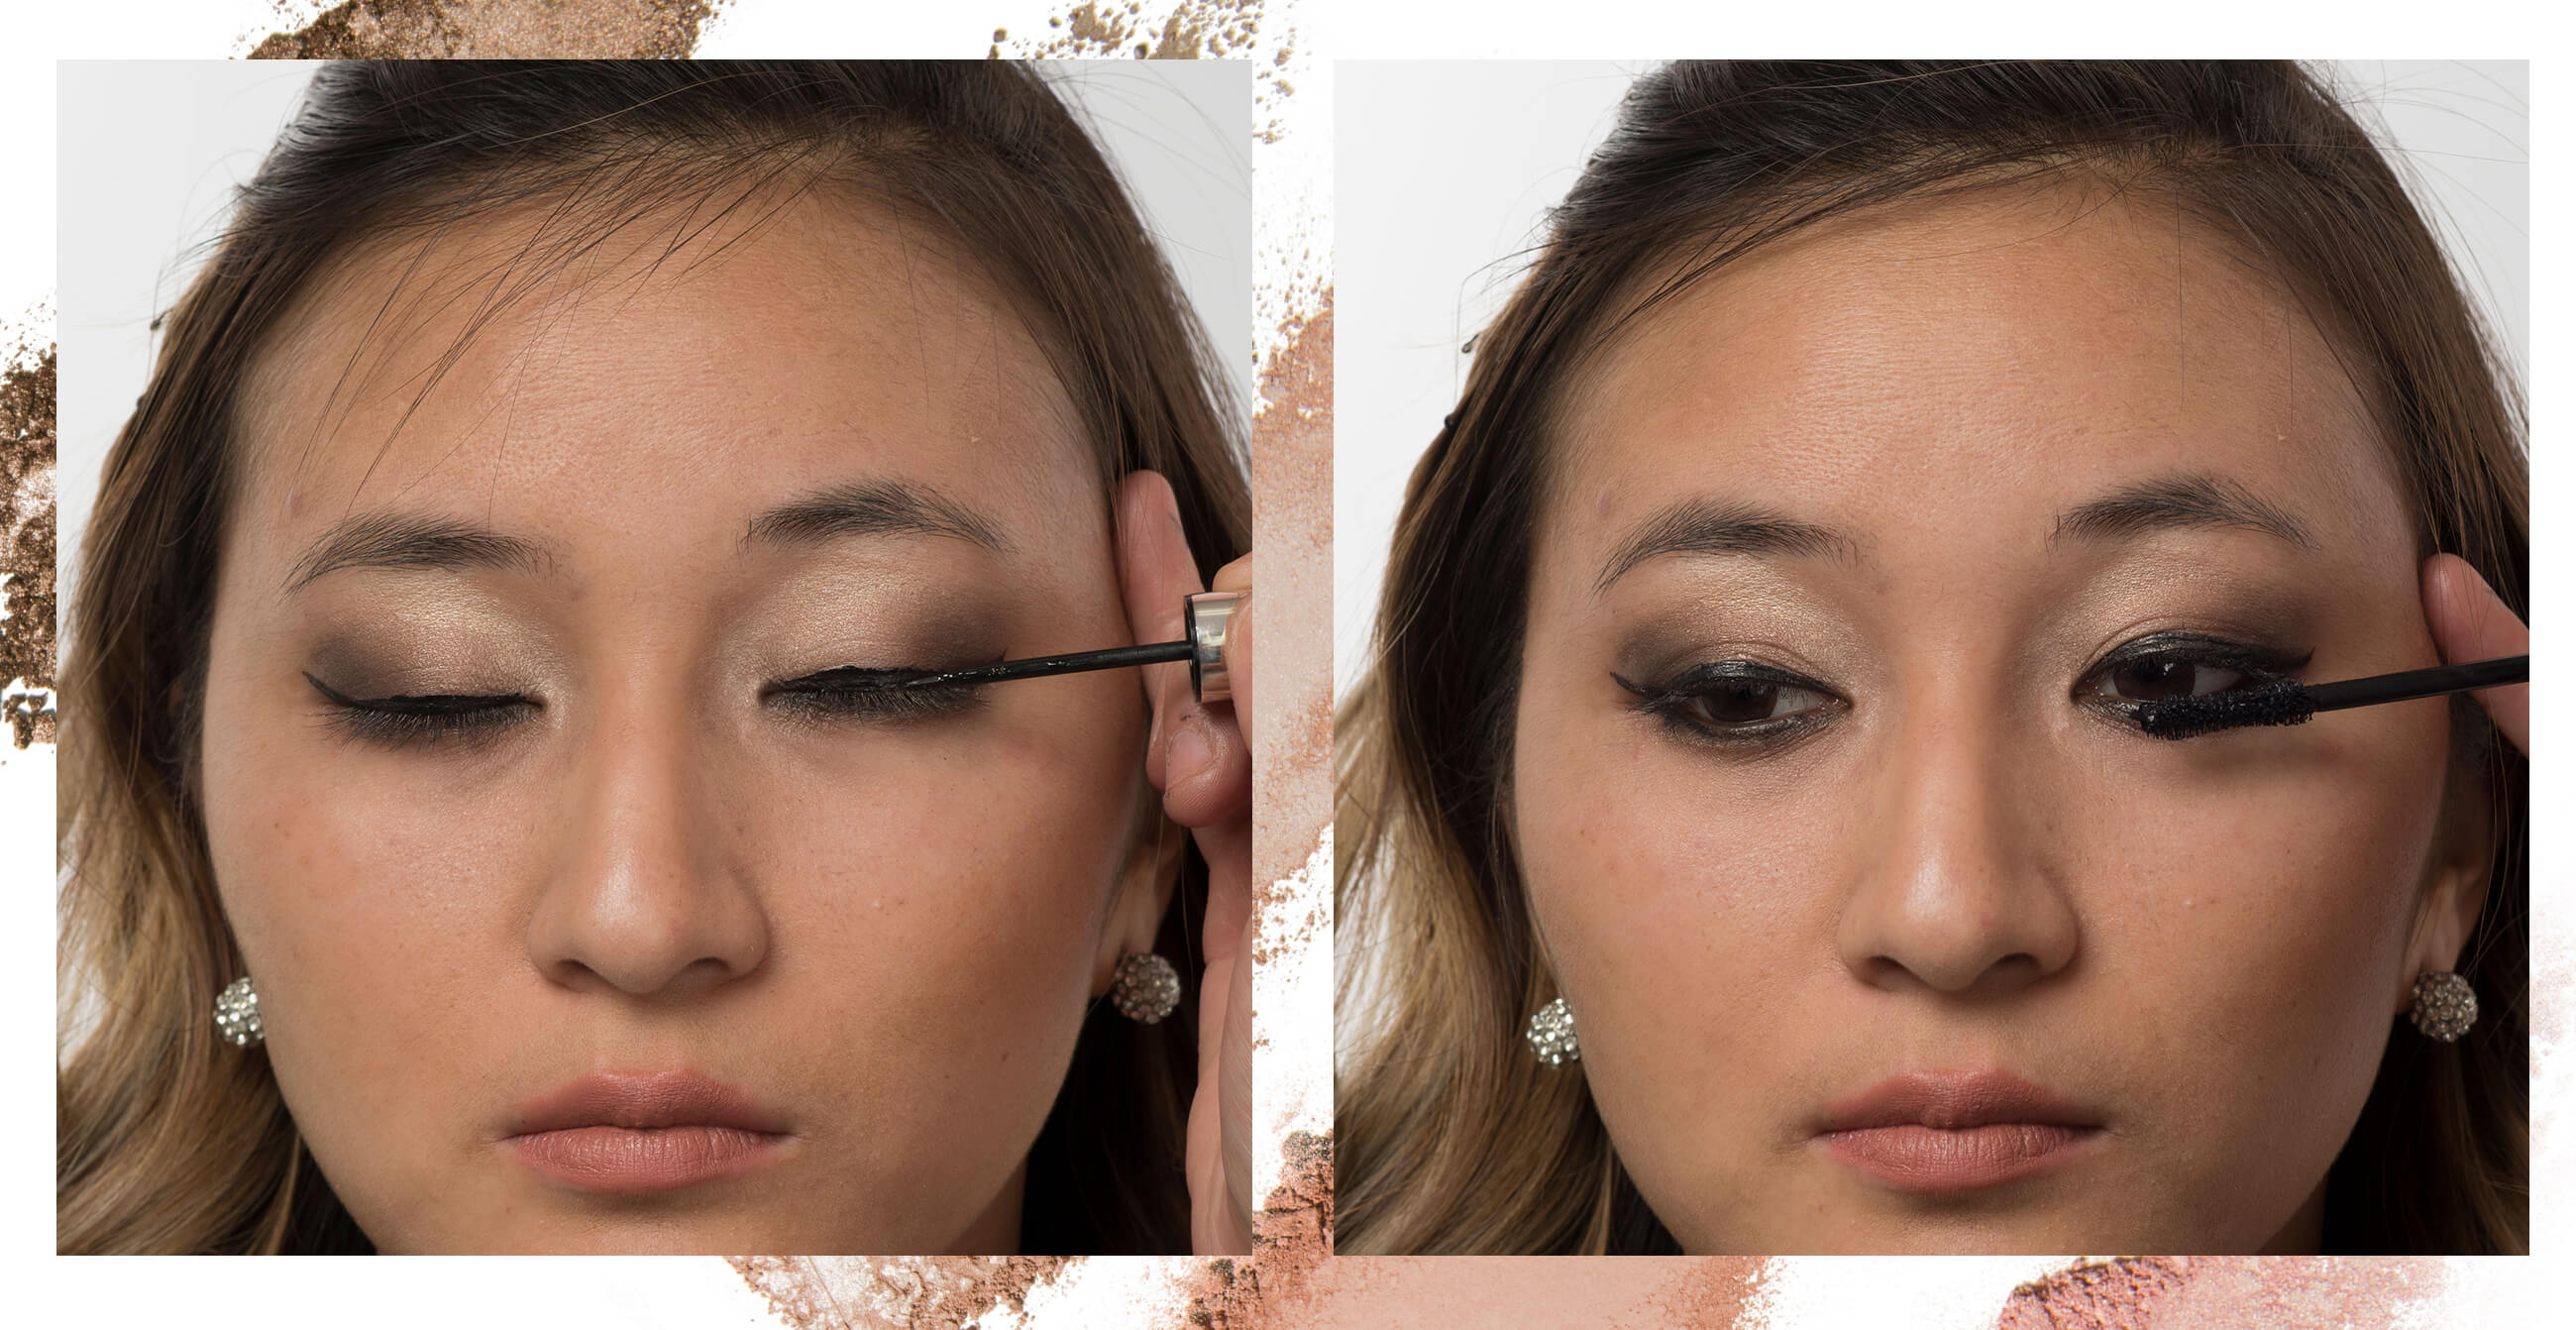
Step 5: Create winged eyeliner with Long Last Liquid Eye Liner: Black Tea and line lower lash line.
What better way to add more va-va-voom to your smokey eyes than a sleek winged eyeliner? For the most flattering winged eyeliner for your eye shape, draw the tail following the natural curve of your bottom lid. As always, stick to short strokes for more precision. Or check out our ultimate breakdown on how to do winged eyeliner in 3 easy steps.
Step 6: Add volume and lengthen lashes with Fruit Pigmented® Ultra Lengthening Mascara - Black Tea.
The perfect complement to your smoldering smokey eyes? Lush lashes, of course. Make sure to start by holding the mascara wand flat against the roots of your lashes, and wiggle upwards to the tips. Our natural mascaras are formulated with natural lash conditioning ingredients and fruit pigments for clump free, smudge free application and wear. You can add on false eyelashes for even more drama. Apply mascara to help meld the falsies to your own lashes.
Step 7: Sculpt and fill brows with Long Last Brows: Medium Brown and Cruelty Free Dual Ended Eyebrow Brush.
For the final step in our fruit pigmented® smokey eye tutorial, make sure not to skimp on the eyebrows. You’ll need to work on shaping your brows too to provide the perfect balance to your smokey eyes. We’ve made things easier for you with our Dual Ended Eyebrow Brush that’s a handy spoolie on one end and an ultra precise angled brush on the other. Brush through your eyebrow hairs with the spoolie. Apply Long Last Brows in short strokes with the angled brush tip. Brush through again with spoolie to evenly distribute natural pigments from cocoa beans and black tea leaves.
For a classic vampy look, pair those finished smokey eyes with Dahlia Pomegranate Oil Anti Aging Lipstick, a shade of deep wine red. For an edgier look, pair your smokey eyes with a soft pink or nude matte lip, like our Bee Balm or Agave Cocoa Butter Matte Lipstick. Now you’re ready to step out the door in style!
We carefully hand-select products based on strict purity standards, and only recommend products we feel meet this criteria. 100% PURE™ may earn a small commission for products purchased through affiliate links.
The information in this article is for educational use, and not intended to substitute professional medical advice, diagnosis, or treatment and should not be used as such.


