
A step-by-step guide on how to contour and how to highlight for your face shape
Updated on June 24, 2018 Written by: 100% PURE®
Contouring is a trend that’s here to stay. It creates flattering lines in the face, and can obscure any curves or edges you’d rather not spotlight. Highlighting has become a makeup phenomenon -- everyone (including us) is obsessed with achieving brilliantly glowing skin via super shimmery highlighters.
In this blog we'll teach you how to contour your face, how to apply highlighter, and how to contour and highlight for your face shape (we’ll help you identify your face shape, too). We'll point you to the right products for each step, including which natural foundations will work best as a highlighting/ contouring base, and will show you which tools to use to get the job done right!

What Is Contouring?
Essentially, when you contour you’re using shading or shadows to create an illusion of recession. Use contouring to help define or reshape your facial features. The areas that are not darkened or shaded then stand out! This can make your cheekbones look more pronounced, your nose more narrow or even help you reduce the appearance of the beloved soft under chin. You’ll instantly transform to a more sculpted Adonis self.
PRO TIP: The key to successful contouring is to always use an opaque matte powder, liquid concealer, or cream foundation.
What Is Highlighting?
When you use the technique of highlighting, you’re doing the opposite of contouring. The areas that have this lighter shade or shimmer will be accentuated and more pronounced. By applying a highlighter or using a strobing effect, you can help emphasize the areas of your face that naturally catch the light.
PRO TIP: To avoid an early 2000’s frosted cupcake look, make sure to choose a highlighter with undertones that complement your skin tone for the perfect subtle sheen.
Foundation/ Concealer Options for Contouring
Bonzer Options for Contouring
Cocoa Pigmented Bronzer (3 shade options)
1-2 shades DARKER of your normal foundation shade
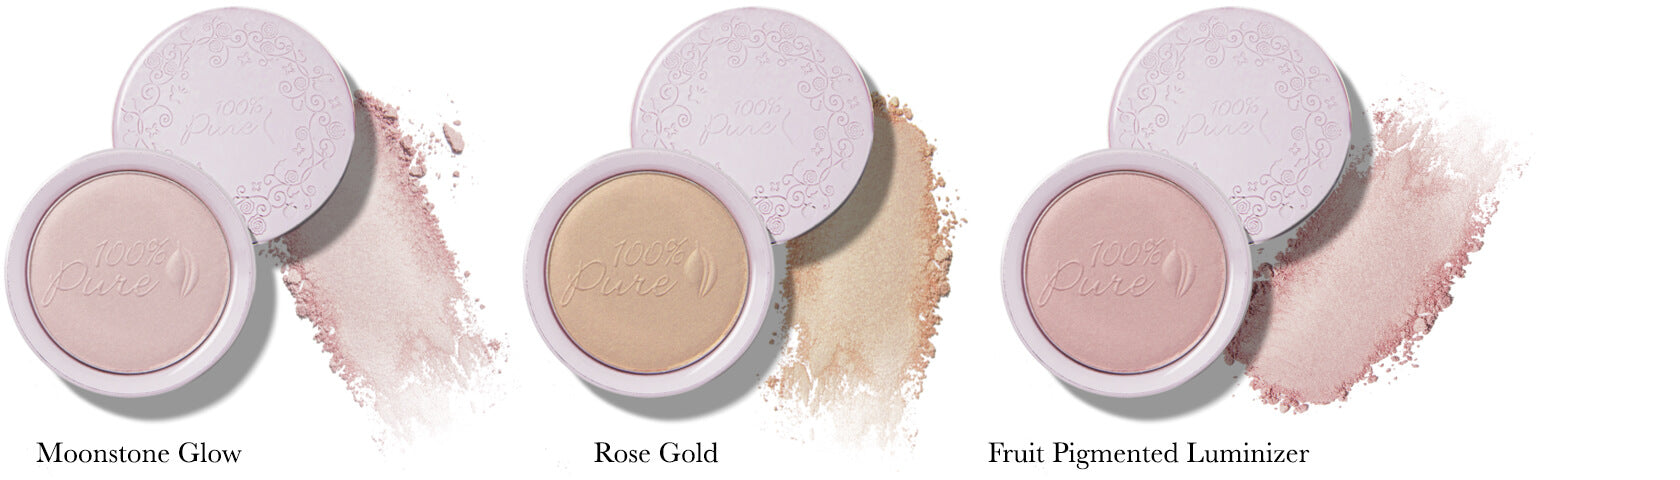
Options for Highlighting
Gemmed Luminizer (2 shade options)
Luminating Creme: Northern Light
1-2 shades LIGHTER of your normal foundation shade
Tools for Contouring and Highlighting
Cruelty Free Angled Contour Brush F30
Cruelty Free Small Stippling Brush F10
Contouring and Highlighting in 5 Easy Steps
STEP 1: Select Foundation
Select your usual foundation shade and apply as you normally would. Don’t forget to set yourself up for success by starting with a Mattifying Primer or Luminous Primer.
STEP 2: Shade Key Areas
Choose a Foundation that is a few shades darker than your skin tone or use a Cocoa Pigmented Bronzer. Use the darker foundation shade (or bronzer) and apply it with our Cruelty Free Angled Contour Brush F30 to the areas that you’d like to contour, such as the hollows of your cheeks, temples, hairline, jawline or nose. The Cruelty Free Crease Brush E40 will help you apply the bronzer in a controlled technique in smaller areas such as the sides of your nose or hair line.
STEP 3: Blend It Out
Start with a lighter application at first. You can always add more to build the intensity. It’s much harder to take away than to add on! Make sure to blend, blend, blend so there are no hard visible lines.
STEP 4: Highlight
Select a foundation shade that is 1-2 shades lighter than you would normally wear, or use a highlighter.
STEP 5: Brighten Key Areas
Apply the highlighter or lighter foundation shade to the areas that would naturally catch light. This is generally the tops of your cheekbones, brow bones, bridge of your nose, forehead and chin using our Cruelty Free Angled Contour Brush F30. Layer on a small amount of highlighter to the cheeks, and nose with our Cruelty Free Small Stippling Brush F10.
Choosing Your Perfect Contour and Highlight Duo
When choosing a natural foundation for contouring, it’s best to stick to the same finish with your highlighter. Different formulas, like using a powder base foundation then a cream foundation to contour, will have mixed results.

Creamy Luminizers:
Luminating Creme: Northern Light
A perfect combination for dewy would be our BB Cream as a base, paired with a darker shade in our Cream Foundation and topped off with a Luminating Créme. A perfect combination for matte would be our Powder Foundation as a base, paired with a darker shade in the same powder foundation formula, and topped off with our Cocoa Pigmented Bronzer - Cocoa Glow.
Powder Luminizers:
Gemmed Luminizer: Moonstone Glow
If you prefer a powdery, more matte finish, we’d recommend using our Bamboo Blur Tinted Moisturizer as a base, paired with a darker shade in our powder foundation. Top this off with a Gemmed Luminizer to keep with the powder formula.
PRO TIP: Our Non Latex Makeup Blender works best for blending cream based foundations. Use our Cruelty Free Angled Contour Brush F30 for blending together powder formulas.
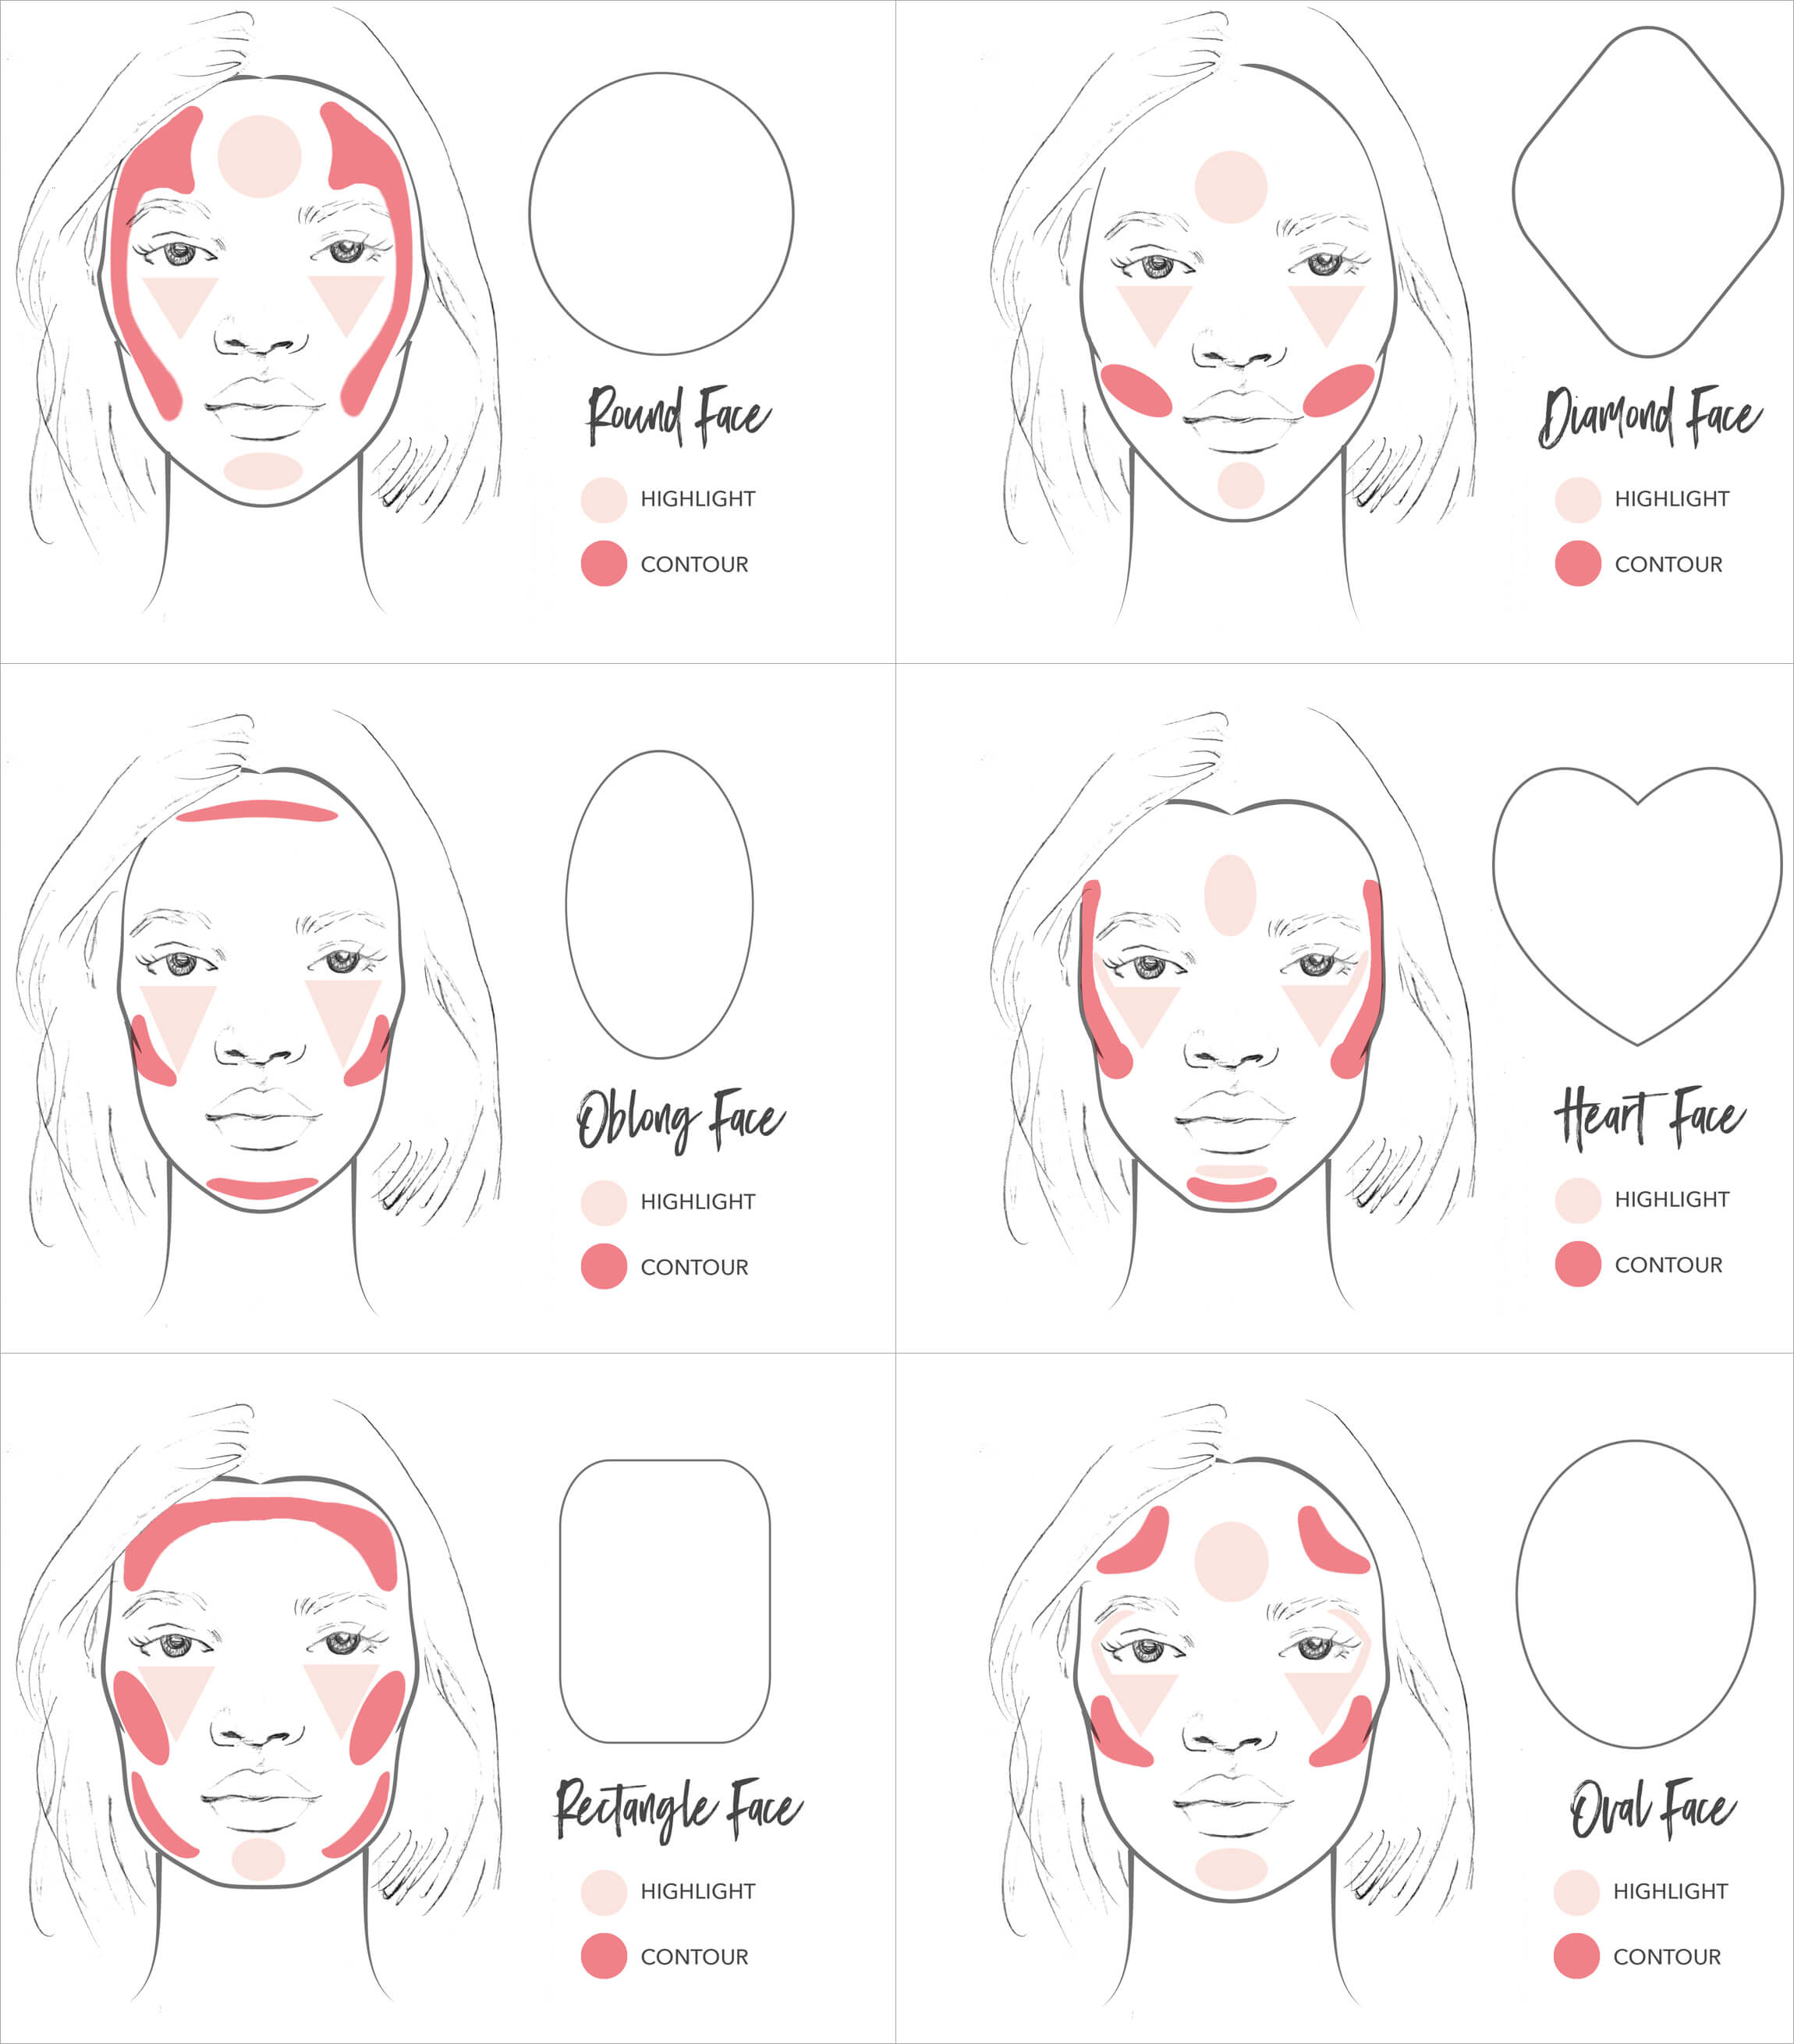
How to Contour and Highlight for Your Face Shape
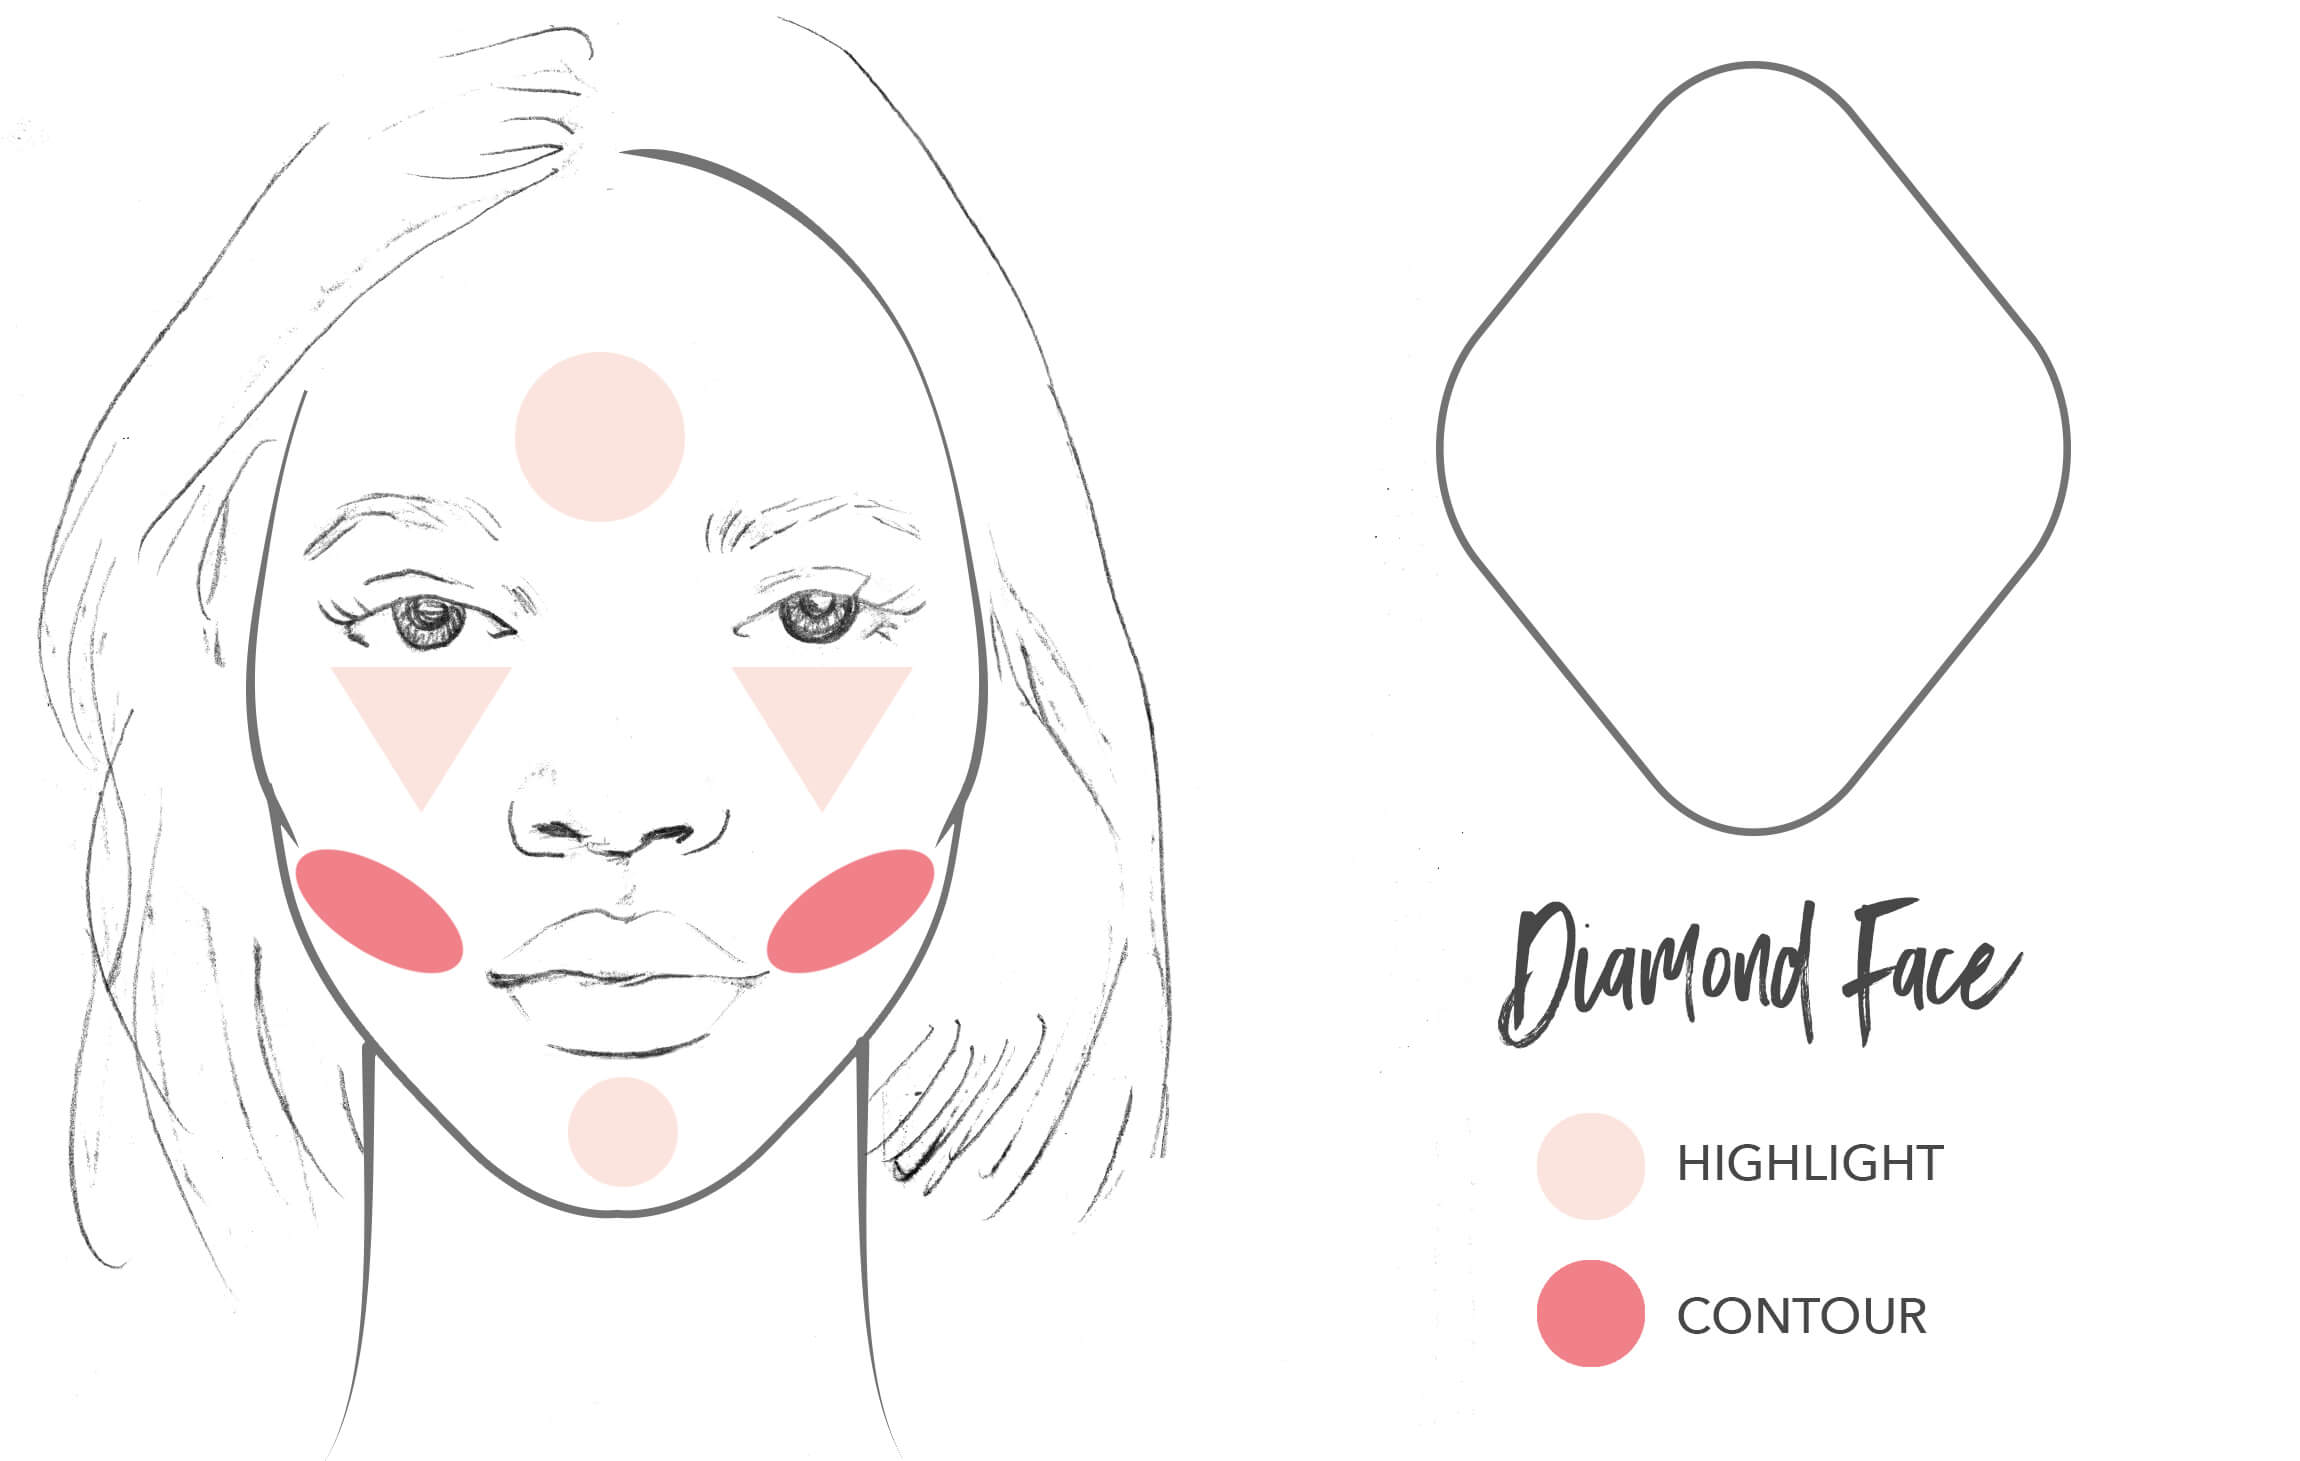
Diamond Face Shape
Key Features:
-
Slightly pointed chin
-
Longer than wider face
-
High cheekbones
-
Hairline is more narrow than cheeks
Makeup Goals:
-
Add fullness to jaw and forehead
-
Minimize cheek width
How to Contour a Diamond Face:
1. Select your usual foundation shade and apply as you normally would.
2. Choose a Foundation that is a few shades darker than your skin tone or use a bronzer. Use the darker foundation shade (or bronzer) and apply it with our Cruelty Free Angled Contour Brush F30 to the area below your cheekbones, only going halfway. Make sure to thoroughly blend so it doesn’t look unnatural.
How to Highlight a Diamond Face:
1. Select a foundation shade that is 1-2 shades lighter, or use a highlighter if you would like a shimmery, luminous look.
2. Apply the lighter foundation or highlighter under your eyes. Draw an upside-down triangle for an extra brightening effect.
3. Brush in the middle of your forehead as well as the middle of your chin. This is where light naturally hits on a diamond face and will help broaden these areas.
4. Add a pop of color to your cheeks with our Fruit Pigmented Blush: Berry. If you’d like to tone down the flush, dab a little highlighter on top to tone it down.
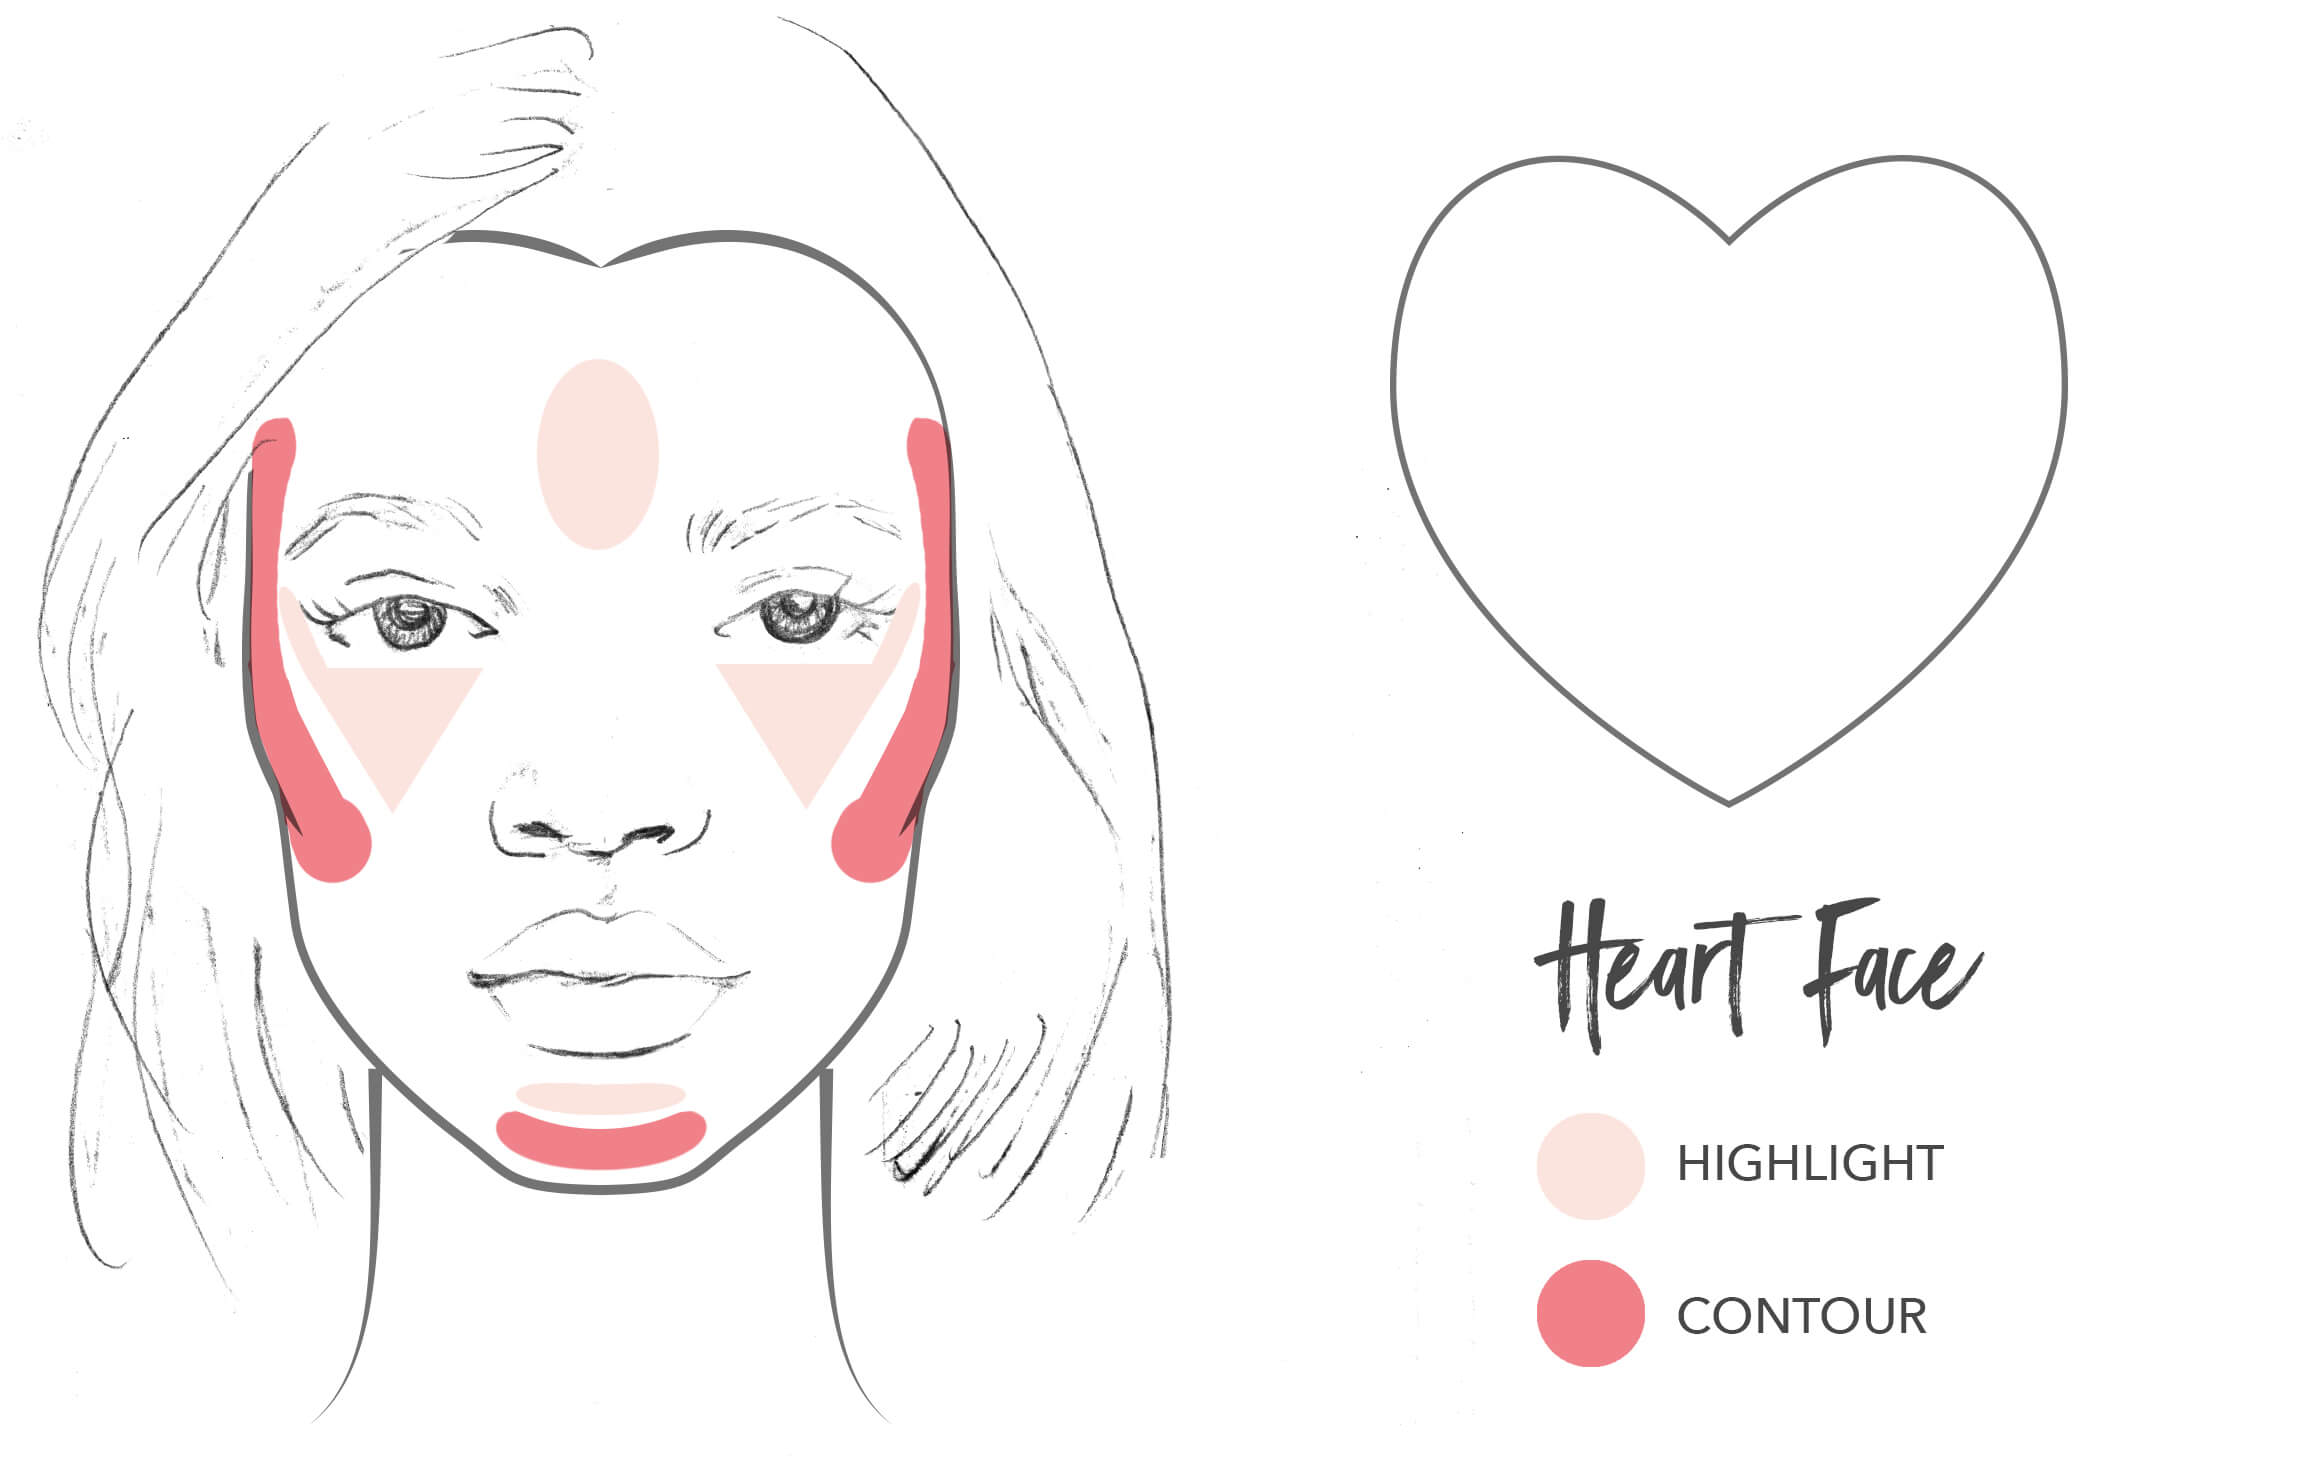
Heart Face Shape
Key Features:
-
Slightly pointed and narrow chin
-
Widow's Peak
-
Forehead is the widest part
Makeup Goals:
-
Balance forehead to chin
-
Play up high cheekbones
How to Contour an Heart Face:
1. Select your usual foundation shade and apply as you normally would.
2. Choose a bronzer or foundation that is a few shades darker than your skin tone. Use the darker shade and apply it with our Cruelty Free Angled Contour Brush F30 to the sides of your forehead, temples to help balance your narrow lower half to the wider upper half of your face. Other key areas to hit for contouring are your cheekbones, making sure to end halfway as well as the center of your chin to help soften the point of the heart. Make sure to thoroughly blend so it doesn’t look unnatural.
How to Highlight a Heart Face:
1. Select a foundation shade that is 1-2 shades lighter, or use a highlighter if you would like a shimmery, luminous look.
2. Apply the lighter foundation or highlighter under your eyes. Draw an upside-down triangle for an extra brightening effect.
3. Brush in the middle of your forehead as well as the middle of your chin. This is where light naturally hits on a heart shaped face and will help broaden these areas.
4. Add a pop of color to your cheeks with our Fruit Pigmented Lip & Cheek Tint: Pink Grapefruit Glow. If you’d like to tone down the flush, dab a little highlighter on top to tone it down
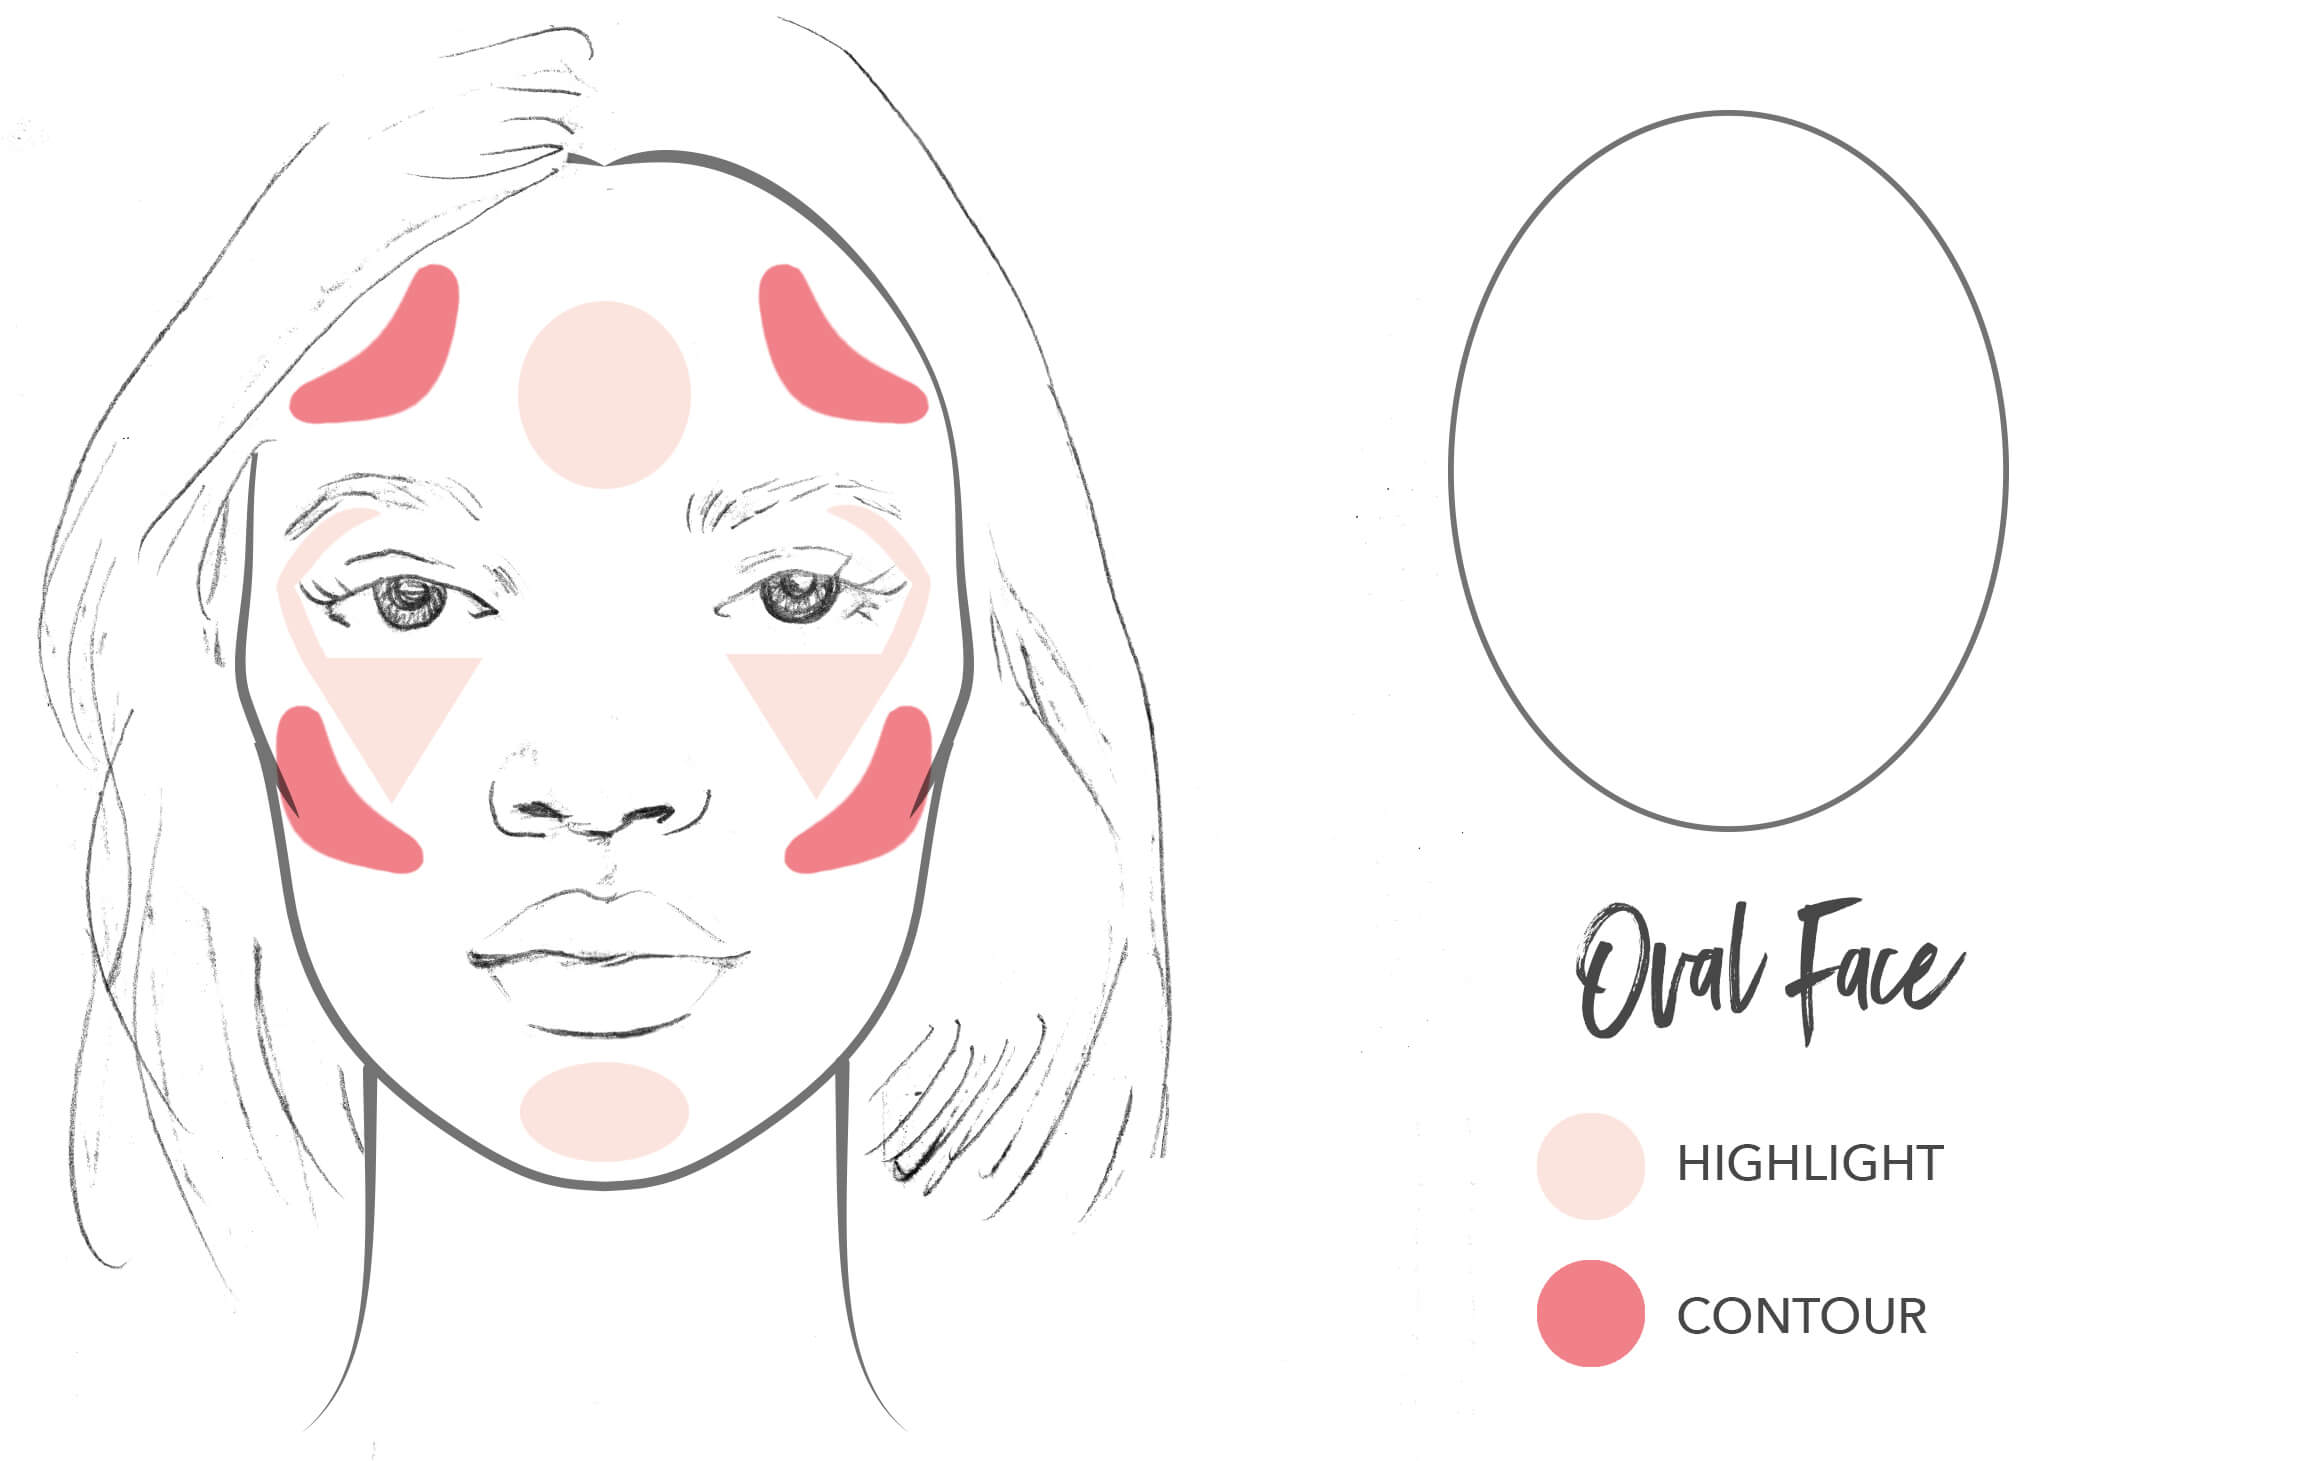
Oval Face Shape
Key Features:
-
No pointed features
-
Face is 1.5x longer than wide
-
Slightly upside down egg-shaped
Makeup Goals:
-
Add depth to cheekbones
-
Play up balanced face shape
How to Contour an Oval Face:
1. Select your usual foundation shade and apply as you normally would.
2. Choose a bronzer or foundation that is a few shades darker than your skin tone. Use the darker shade and apply it with our Cruelty Free Angled Contour Brush F30 to the sides of your forehead, helping to appear more narrow. Also apply it below your cheekbones, ending halfway. Make sure to thoroughly blend so it doesn’t look unnatural.
How to Highlight an Oval Face:
1. Select a foundation shade that is 1-2 shades lighter, or use a highlighter if you would like a shimmery, luminous look.
2. Apply the lighter foundation or highlighter under your eyes. Draw an upside-down triangle for an extra brightening effect.
3. Brush in the middle of your forehead as well as the middle of your chin. This is where light naturally hits on an oval shaped face and will help broaden these areas. Finish with lightly applying under your eyes and brow bone to brighten under your eyes.
4. Add a pop of color to your cheeks with our Fruit Pigmented Pot Rouge: Pinkie. If you’d like to tone down the flush, dab a little highlighter on top to tone it down.
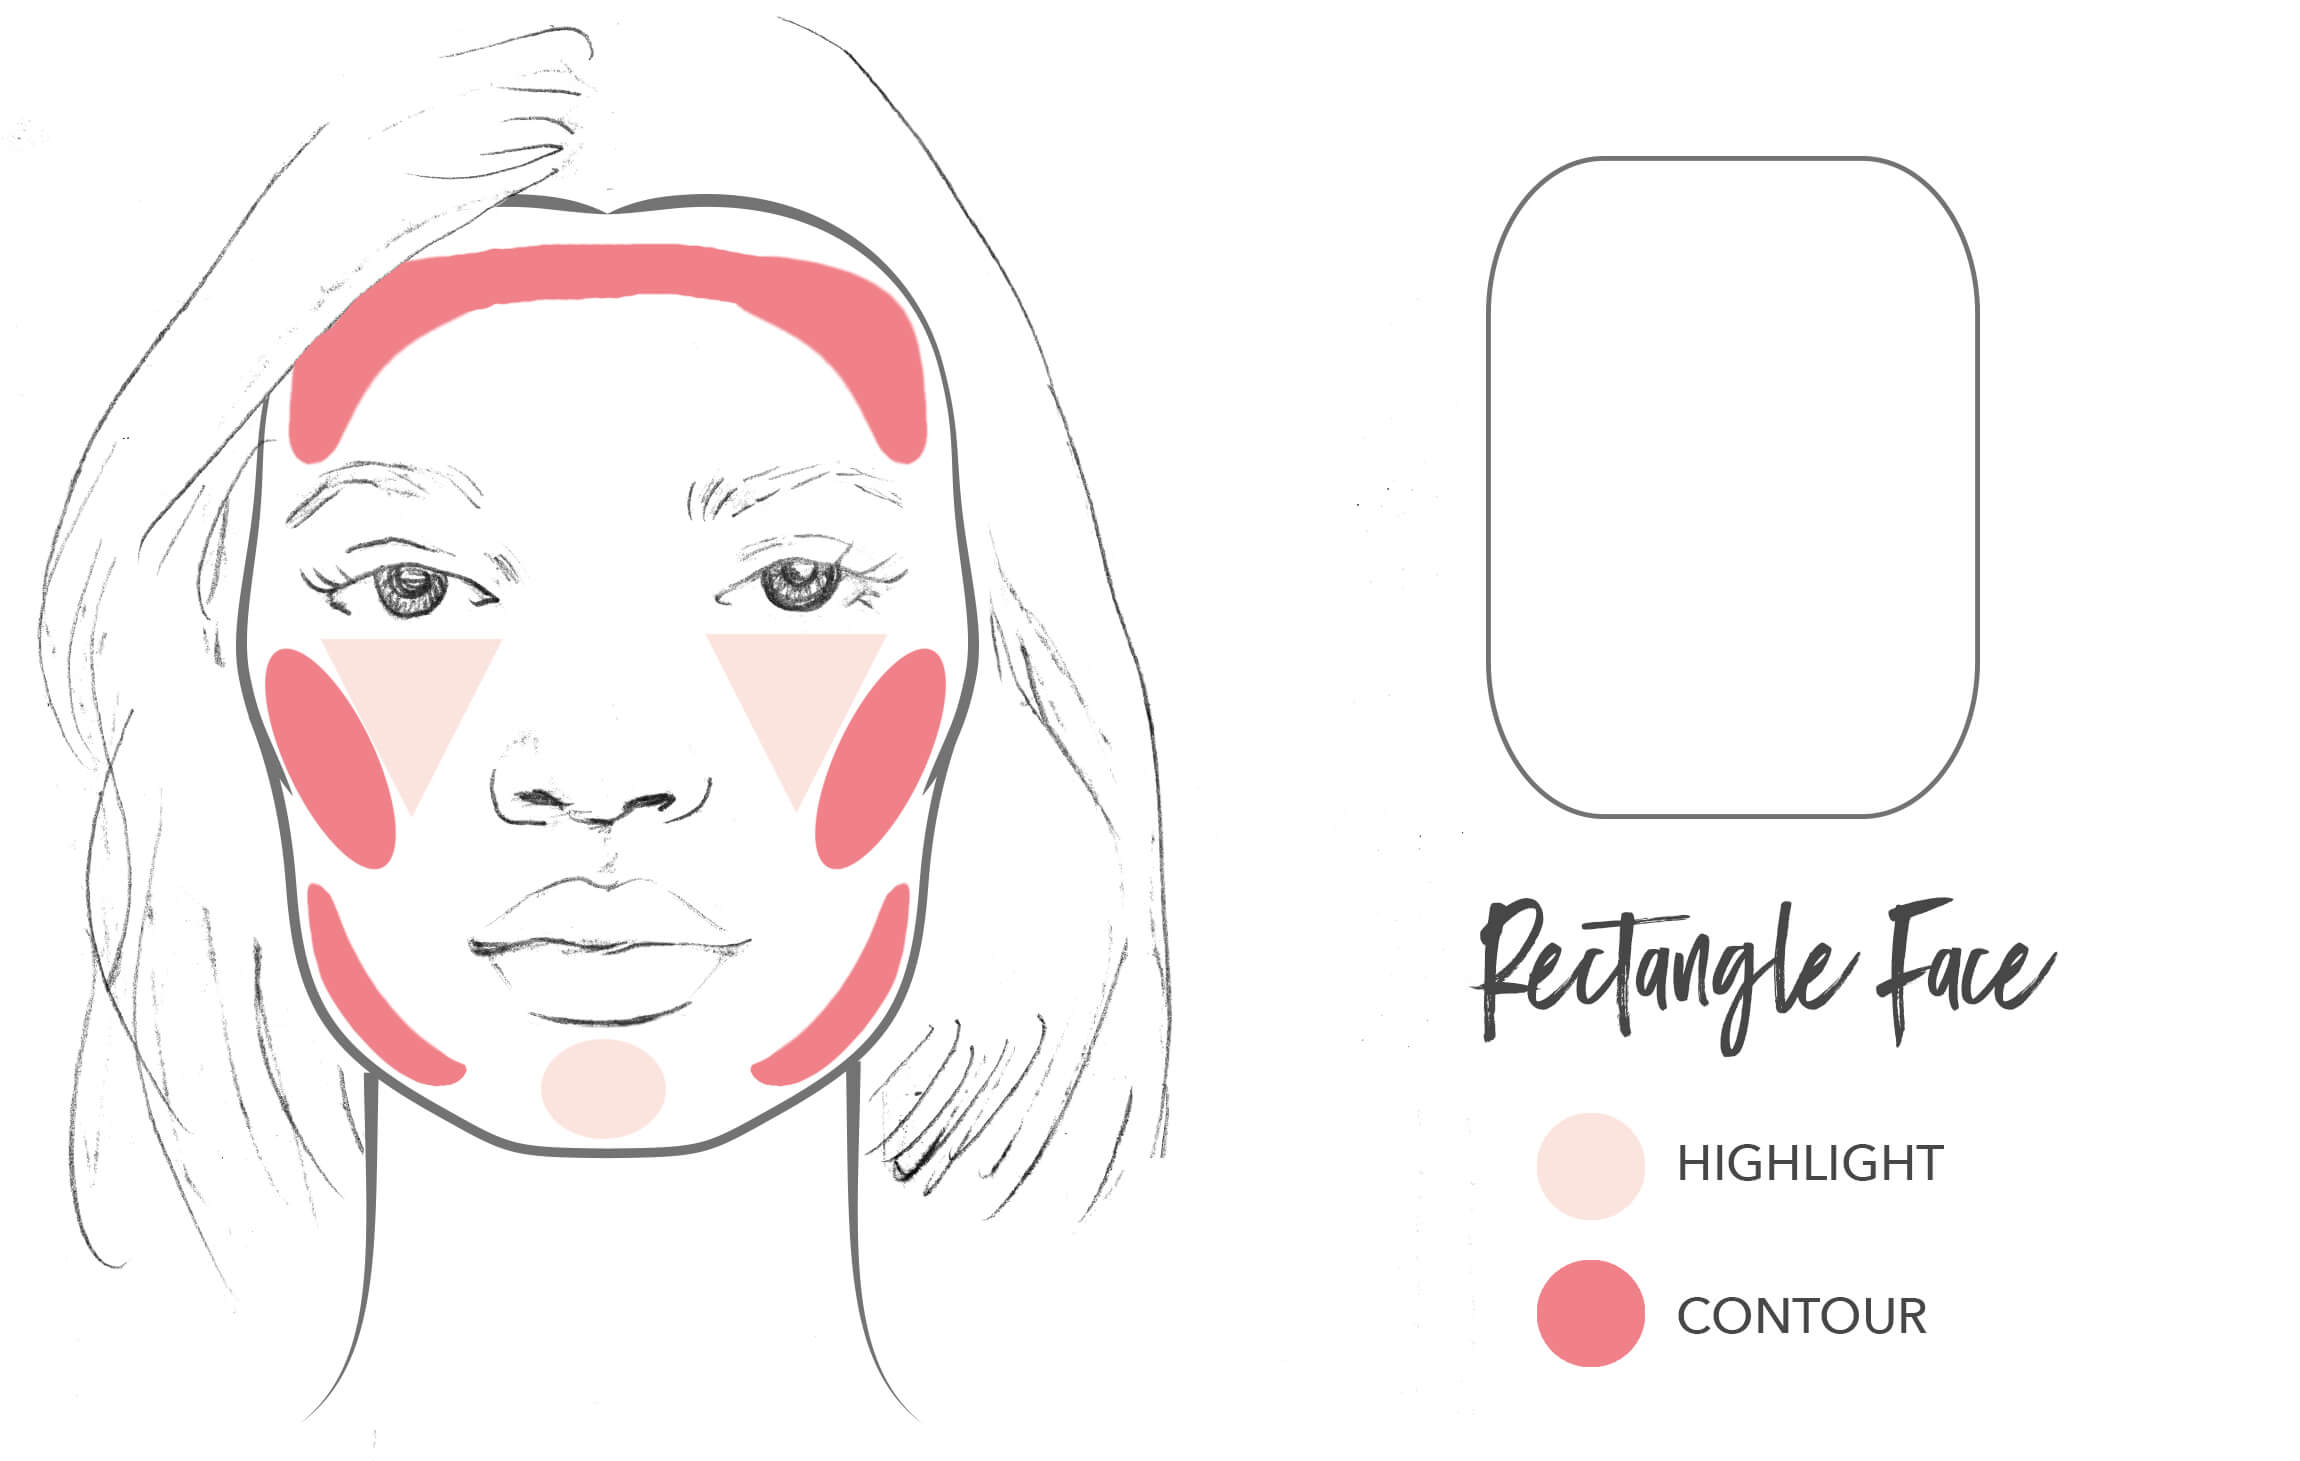
Rectangle Face Shape
Key Features:
-
Square jaw line
-
Face is longer than wide
-
Width of hairline and jaw even
Makeup Goals:
-
Soften corners of face
-
Define cheekbones
How to Contour a Rectangle Face:
1. Select your usual foundation shade and apply as you normally would.
2. Choose a bronzer or foundation that is a few shades darker than your skin tone. Use the darker shade and apply it with our Cruelty Free Angled Contour Brush F30 to the sides of your hairline, helping your face appear more narrow. Also apply it along your hairline, under your jawbone to create a narrow illusion and cheekbones only going halfway. Make sure to thoroughly blend so it doesn’t look unnatural.
How to Highlight a Rectangle Face:
1. Select a foundation shade that is 1-2 shades lighter, or use a highlighter if you would like a shimmery, luminous look.
2. Apply the lighter foundation or highlighter under your eyes. Draw an upside-down triangle for an extra brightening effect
3. Brush in the middle of your chin. This is where light naturally hits on an rectangle shaped face and will help broaden this area. Finish with lightly applying under your eyes and brow bone to brighten under your eyes.
4. Add a pop of color to your cheeks with our Fruit Pigmented Lip & Cheek Tint: Shimmery Cocoa Berry. If you’d like to tone down the flush, dab a little highlighter on top to tone it down.
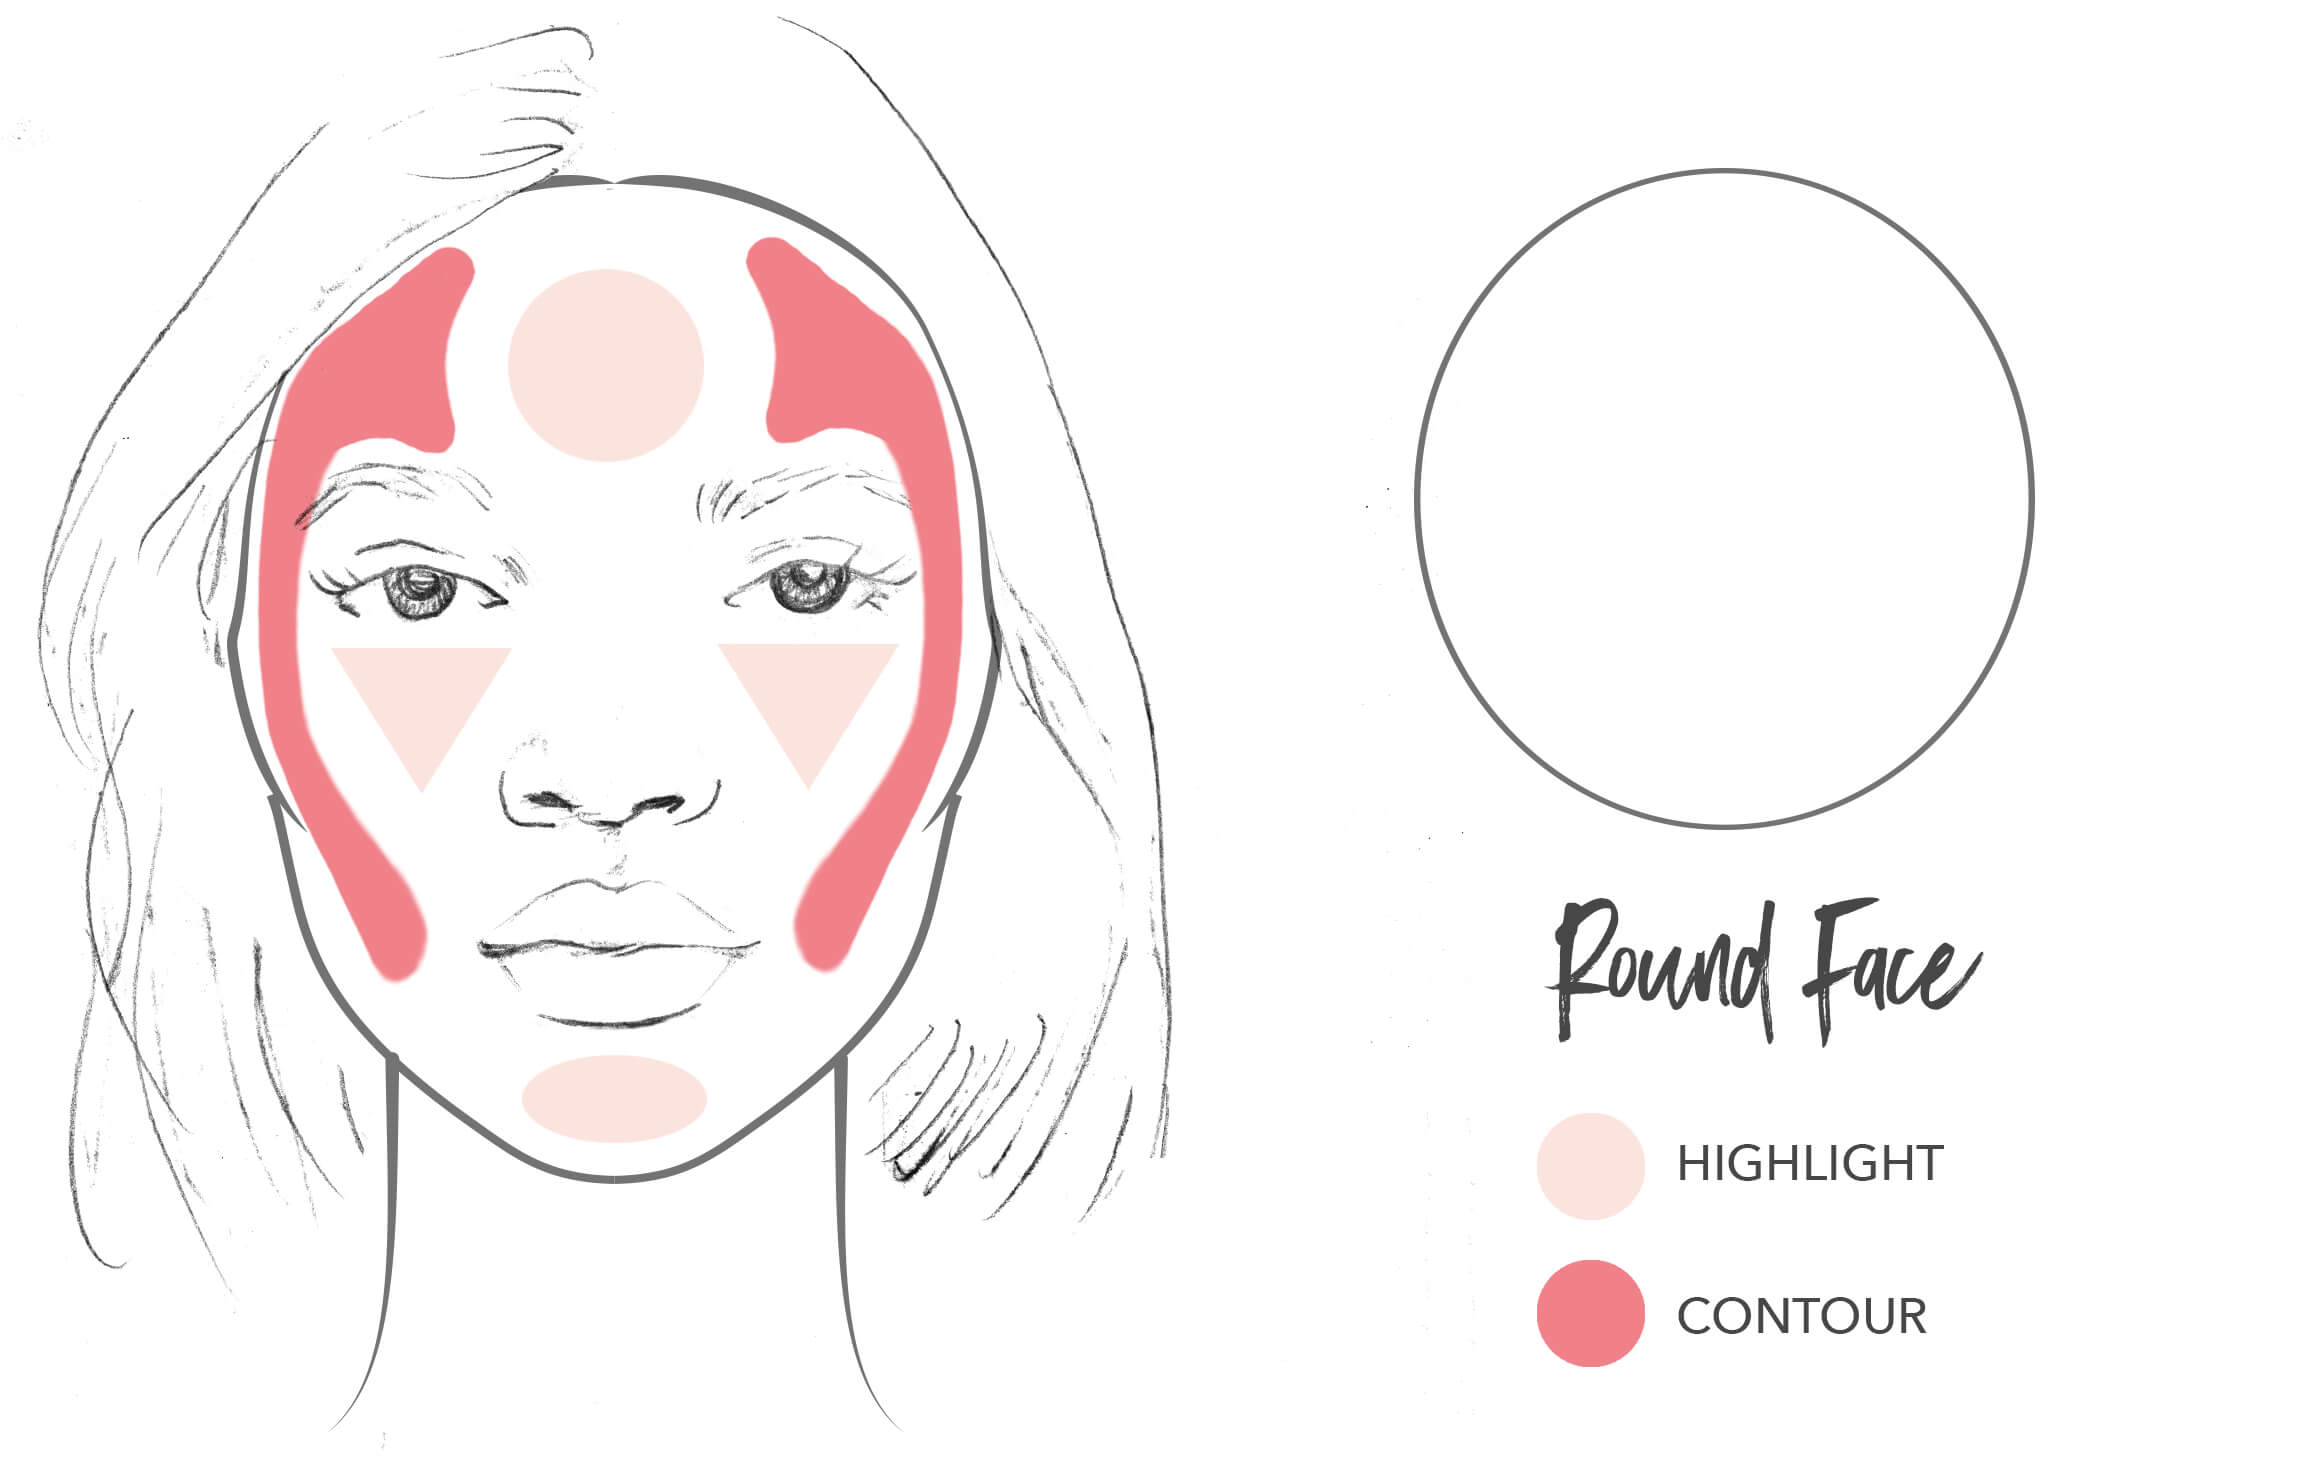
Round Face Shape
Key Features:
-
No pointed features
-
Face is long as it is wide
-
Rounded cheeks
Makeup Goals:
-
Add angles and depth to cheekbones
-
Create structure
How to Contour a Round Face:
1. Select your usual foundation shade and apply as you normally would.
2. Choose a bronzer or Foundation that is a few shades darker than your skin tone. Use the darker shade and apply it with our Cruelty Free Angled Contour Brush F30 to the sides of your forehead and along your temples to give the appearance of narrowness. Also apply to the areas below your cheekbones, only going halfway, using a curved line to your jawline to help lengthen your face. Make sure to thoroughly blend so it doesn’t look unnatural.
How to Highlight a Round Face:
1. Select a foundation shade that is 1-2 shades lighter, or use a highlighter if you would like a shimmery, luminous look.
2. Apply the lighter foundation or highlighter under your eyes. Draw an upside-down triangle for an extra brightening effect.
3. Brush in the middle of your forehead and cheekbones. This is where light naturally hits on a round shaped face and will help broaden this area. Finish with lightly applying under your eyes to brighten.
4. Add a pop of color to your cheeks with our Fruit Pigmented Blush: Pretty Naked. If you’d like to tone down the flush, dab a little highlighter on top to tone it down.
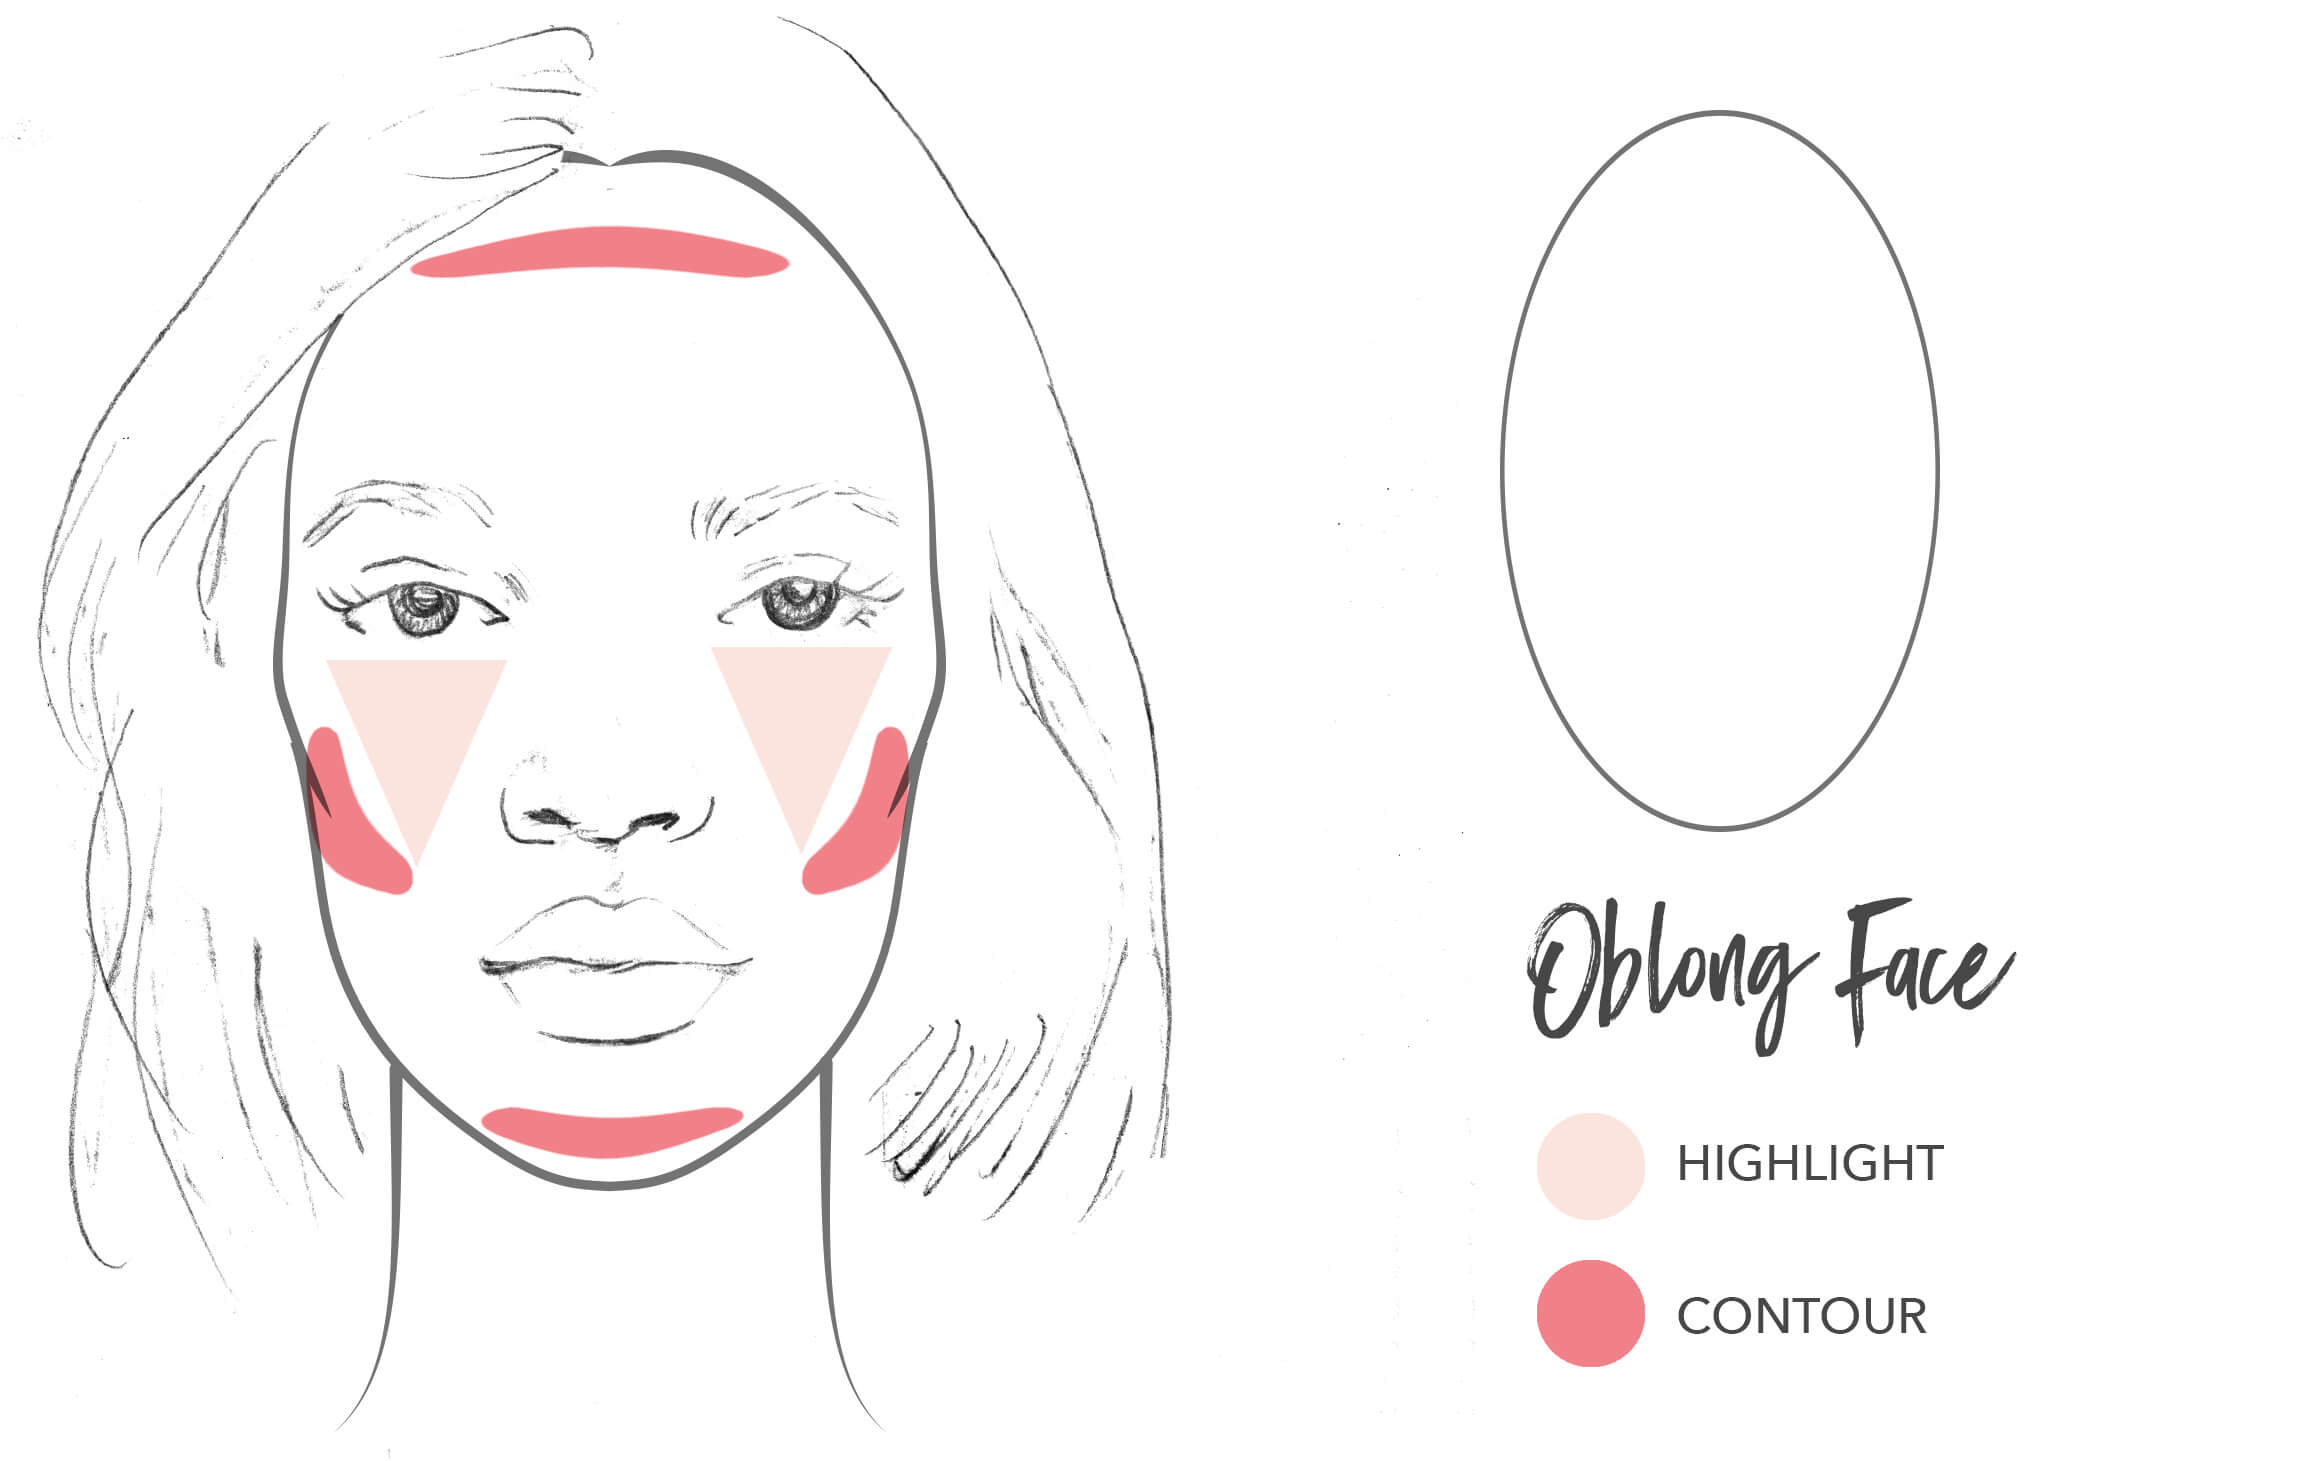
Oblong Face Shape
Key Features:
-
Face is 2x longer than wide
-
No pointed features
-
Narrow chin
Makeup Goals:
-
Balance height to width
-
Enhance cheek width
How to Contour an Oblong Face:
1. Select your usual foundation shade and apply as you normally would.
2. Choose a Bronzer or Foundation that is a few shades darker than your skin tone. Use the darker shade and apply it with our Cruelty Free Angled Contour Brush F30 to your hairline to help lower your hairline. Apply under your chin, for a rounder face as well as below your cheekbones, only halfway. Make sure to thoroughly blend so it doesn’t look unnatural
How to Highlight an Oblong Face:
1. Select a foundation shade that is 1-2 shades lighter, or use a highlighter if you would like a shimmery, luminous look.
2. Apply the lighter foundation or highlighter under your eyes. Draw an upside-down triangle for an extra brightening effect. This is where light naturally hits on an oblong shaped face and will help broaden this area.
3. Add a pop of color to your cheeks with our Fruit Pigmented Lip & Cheek Tint: Sugar Plum Sheer. If you’d like to tone down the flush, dab a little highlighter on top to tone it down
A beach-worthy summer makeup look should always start with fruit pigmented®, natural makeup products. Your skin will thank you for taking such good care of it! Whether you want a deeply sun kissed look with reflective, golden pigments, or a subtle, luminescent highlighting glow to make your face sparkle and shimmer, we’ve got you covered. Looking for more makeup guides? Check out the “Makeup” section of our 100% PURE Beauty Blog!
We carefully hand-select products based on strict purity standards, and only recommend products we feel meet this criteria. 100% PURE™ may earn a small commission for products purchased through affiliate links.
The information in this article is for educational use, and not intended to substitute professional medical advice, diagnosis, or treatment and should not be used as such.